[ UPDATE] The tool has been re-written. New details can be found here: http://www.shellntel.com/blog/2015/9/9/update-creating-your-own-private-botnet-for-scanning
Often while scanning a network with nmap or other similar tools, at some point a NIDS or firewall will detect and block me. This is irritating. I wondered, what would happen if I could route my scans/attacks through a series of proxy servers. One option, would be to tunnel my attacks through tor, however, tor is unreasonably slow and some firewalls black list known tor exit nodes.
Instead, what about creating your own botnet using a cloud provider and routing your traffic through it? This turns out to be surprisingly easy. For our engagements, we chose to use Amazon's EC2. This was done for two reasons, 1) They have a great API 2) They offer super cheap instances (t2.micro).
We created a quick script that can be used to automatically spin up EC2 instances, provision them, and tunnel connections randomly through each node. This script was tested and works good with kali, although it should run fine on any system running python. Note, you will need to install one non-default python dependency, boto. Boto is used to communicate with the Amazon cloud. To install boto, issue the following command:
pip install -U boto
Also, you'll need an active Amazon EC2 access key. If you don't have one already, you can create one using the following steps:
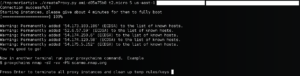
Next install the script:
git clone https://github.com/Shellntel/scripts
Once installed, you should be able to run it by providing the following required variables:
positional arguments:
  image_id          Amazon ami image ID. Example: ami-d05e75b8
  image_type        Amazon ami image type Example: t2.micro
  num_of_instances  The number of amazon instances you'd like to launch
  region            Select the region: Example: us-east-1
  key_id            Amazon Access Key ID
  access_key        Amazon's Secret Key Access
When run, the script will connect to EC2, spin up 'num_of_instances' (standard account limits you to 20, but you can ask amazon for more), establish a port forwarded SSH tunnel to each instance, then create a proxychains config which you can then use for your scanning. An example where we spin up 5 t2.micro instances of ubuntu in the us-east-1 region, and then run our nmap scan through it.
Now, in a new tab/window, we can run our nmap scan which will be routed through the 5 instances evenly, with each new TCP session being sent through a different node.
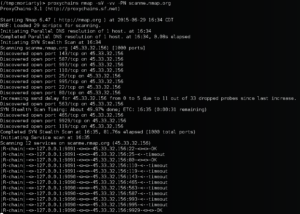
You'll notice that the output is a bit different than your typical nmap scan. The |R-chain| message is from proxy chains informing us that a session on one of our nodes timed out. This could be due to one of two reasons. 1) The target we're scanning has detected us and is blocking one of our scanning nodes, or 2) since we're using Amazons t2.micro instance, we're not always guaranteed to get the resource. (to get a guaranteed resource, you can choose a higher powered instance). However, the script creates a config for proxy chains which tells it to flag when a node has stopped responding, and to ignore it going forward. This means our scan isn't halted by this timeout, it just fails over to the next available node.
When finished, all you have to do is type enter in the first console. The script will terminate the instances, remove the temporarily created ssh keys and firewall rules used for the cluster.