When on an engagement, sometimes we'll encounter an eager blue team hellbent on identify and blocking our attacks. Typical in those instances we'd use proxy-cannon and route through multiple (ever changing) Amazon EC2 hosts. However, what if you send shells back to a host that is easily "burnable".
Introducing spin-up: A quick tool used designed to provision EC2 hosts on the fly for engagements where you want quick listener in the cloud.
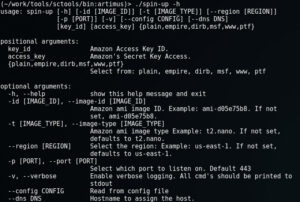
Spin-up, in its current form, is a python script that will connect to EC2 and provision and connect you to one of the following instance:
Before we can begin, there are two things you need, one being optional:
We use Amazons AMI Access keys to launch instances on the fly. And we use Route53 (also through amazon) to register DNS. It is possible to buy domain records on the fly, though in our case we're re-using existing records. All of this information can then be placed into the config and referenced at launch time.

Example of a DNS record in Amazons Route53
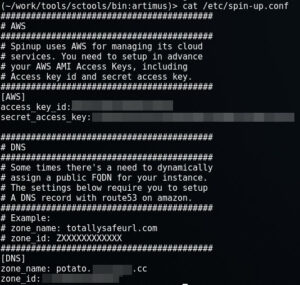
Example Config
Lets say you want to spin up a single instance of Empire, with a DNS name (useful for when your servers are blocked but your agents are still calling home... just update that record). Over HTTPS on port 443. For that you'd do:
./spin-up --config /etc/spin-up.conf -p 443 --dns totallysafe empire
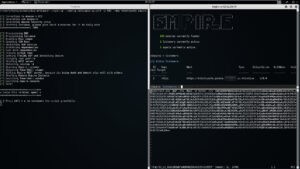
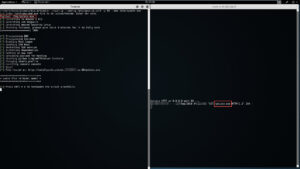
Note: The consoles on the right auto fire for you:)
Lets say you want to spin up a single instance of Metasploit, with DNS, over port 8443. For that you'd do:
./spin-up --config /etc/spin-up.conf -t m3.medium -p 8443 --dns totallysafe msf
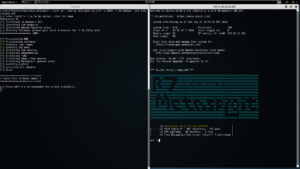
Note: You have the option to load a locally source RC file and have it run on the remote system.
Note 2 : Some instances require more horse power so for MSF you must use a m3.medium instance or greater.
Lets say you want to spin up a single instance of a WWW server, hosting your awesome phish/malware. For that you'd do:
./spin-up --config /etc/spin-up.conf -p 80 --dns totallysafe www
Lastly, if you wanted to spin up a single instance of Pentestsers Framework, assign it a DNS name of totally safe and open inbound port 8080, then you'd do:
./spin-up --config /etc/spin-up.conf -p 8080 --dns totallysafe ptf
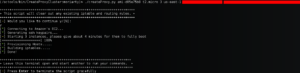
You get the idea. Spin-up also supports a plain version where you'll be dropped to shell prompt to install whatever you'd like. All instances are launched within a screened session, so if you ever need to move locations, or your session dies for whatever reason, you can always come back to it. (SSH keys are stored in temp). When you're done, just hit ctrl-c and the instance will shutdown cleanly, and you're good to move on. Check it out, and if you have any issue please submit them via github.
@jarsnah12
ProxyCannon, which can be found here, has undergone some revisions since our initial release and as a result, there's some new features we'd like to introduce.
We've cleaned up the number of arguments required to run the app from 6 to 3. Now you only need to specify the AMI KEY, AMI ID, and the number instances you'd like start. You can still specify images size, type, etc, we just set the most cost effective options as default.
So if you're familiar with the older version of createProxy, you'll notice we've added new options.
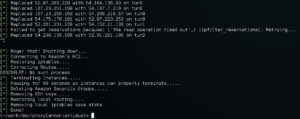
So even by sending your Nessus scans across 10 Amazon EC2 hosts an IPS can still detect and shun one of your exit nodes. To deal with this, we've added the -r feature which will automatically rotate the public IP address of every exit node. Let say for example you fire up proxy cannon with 10 nodes and add the -r switch. The first thing the script will do is build the egress nodes, tunnels, iptables and routes like normal. Next the script will choose one node (at random) and alter the local route table to make that it appear less appealing than the other 9. As a result, all new outbound TCP/UDP/ICMP packets will be traverse the remaining 9 nodes evenly all the while allowing any existing session data on the chosen node time to finish receiving its data. The script will then monitor the network state table for the chosen node. Once it identifies that the node is idle (i.e. no half open TCP/UDP/ICMP packets), proxyCannon tells Amazon to re-assign the nodes WAN IP. Next ProxyCannon will reprovision the host and add it back into the general pool of 10 nodes, and move onto the next. On average, regardless of the number of exit nodes provisioned, proxyCannon will change its exit nodes IP's about 30 times in one hour without dropping / breaking a single session!
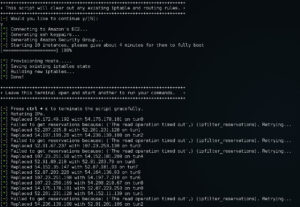
Rotate Nodes (-r) in action. You'll note a few AWS API timeouts. Proxy Cannon will now attempt to recover its state automatically without immediately giving up.
ProxyCannon makes use of iptables to do its natting. In the past, if you ran it, your previous iptables state (if any) was lost. With this update, your previous iptable state will be saved before running, and restored when finished.
We've added better (not perfect) signal handling, so that if/when an issue arises, ProxyCannon will attempt to cleanup up gracefully, restoring your system to its previous state.
If you ever want to know what WAN IP's your traffic took you can use the -l switch to record a log to the /tmp directory.

Take a look and try it out. If you run into any problems please reach out to SynerComm.
@jarsnah12
This is an update to an older post that can be found here. Since createProxy's initial release, we've received some great feedback and, as a result, we made some improvements. There were several shortcomings with the previous version, all of which rested on the use of ProxyChains. ProxyChains is old, outdated, and failed to support protocols such as UDP or ICMP or Java apps (i.e. Burp). So it was re-written, code can be found: https://github.com/Shellntel/scripts/blob/master/proxyCannon.py
The original version used SSH's ability to create SOCKS proxies; however, as it turns out SSH also supports the ability to create both layer 2 and layer 3 tunnels. These are different than SOCKS connection, in that a fully-fledged network tunnel is established between the two endpoints. Find more details on how to set this up here.
The new proxyCannon script takes advantage of this feature by building VPN tunnels to each EC2 instance and round robining locally generated traffic between each one. Since we're using the local systems routing table all session information will be retained (i.e. TCP streams are not split between systems). Furthermore, now we can push any network based traffic across it: TCP, UDP, ICMP and more.
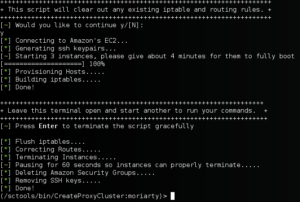
Below are some pictures of proxyCannon in use:
An example of the script starting up 3 ami-d05e75b8 (ubuntu) instances on t2.micro hardware in the us-east-1 region.
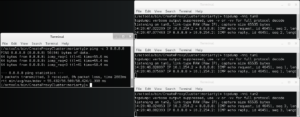
Next, in a new tab we verify that our connections are up

Here we can see that 3 SSH connections are successfully established to each public IP of the ec2 instances started

And here we can see that 3 new interfaces were created, one for each SSH tunnel established
With everything stood up, we run a simple test. In one tab we run a simple ping with a count of 3.
We can see that each ICMP packet is sent through a different EC2 node. Also note the time stamps on the packet each node is used randomly!
That it! Browsers, pentesting tools, whatever, should all work seamlessly. To close down the proxy, just go back to your first tab and hit enter.
Any questions, comment or bugs, please feel free to submit them to github. Thanks!
[ UPDATE] The tool has been re-written. New details can be found here: http://www.shellntel.com/blog/2015/9/9/update-creating-your-own-private-botnet-for-scanning
Often while scanning a network with nmap or other similar tools, at some point a NIDS or firewall will detect and block me. This is irritating. I wondered, what would happen if I could route my scans/attacks through a series of proxy servers. One option, would be to tunnel my attacks through tor, however, tor is unreasonably slow and some firewalls black list known tor exit nodes.
Instead, what about creating your own botnet using a cloud provider and routing your traffic through it? This turns out to be surprisingly easy. For our engagements, we chose to use Amazon's EC2. This was done for two reasons, 1) They have a great API 2) They offer super cheap instances (t2.micro).
We created a quick script that can be used to automatically spin up EC2 instances, provision them, and tunnel connections randomly through each node. This script was tested and works good with kali, although it should run fine on any system running python. Note, you will need to install one non-default python dependency, boto. Boto is used to communicate with the Amazon cloud. To install boto, issue the following command:
pip install -U boto
Also, you'll need an active Amazon EC2 access key. If you don't have one already, you can create one using the following steps:
Next install the script:
git clone https://github.com/Shellntel/scripts
Once installed, you should be able to run it by providing the following required variables:
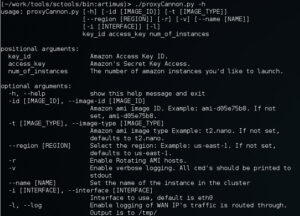
positional arguments:
  image_id          Amazon ami image ID. Example: ami-d05e75b8
  image_type        Amazon ami image type Example: t2.micro
  num_of_instances  The number of amazon instances you'd like to launch
  region            Select the region: Example: us-east-1
  key_id            Amazon Access Key ID
  access_key        Amazon's Secret Key Access
When run, the script will connect to EC2, spin up 'num_of_instances' (standard account limits you to 20, but you can ask amazon for more), establish a port forwarded SSH tunnel to each instance, then create a proxychains config which you can then use for your scanning. An example where we spin up 5 t2.micro instances of ubuntu in the us-east-1 region, and then run our nmap scan through it.

Now, in a new tab/window, we can run our nmap scan which will be routed through the 5 instances evenly, with each new TCP session being sent through a different node.
You'll notice that the output is a bit different than your typical nmap scan. The |R-chain| message is from proxy chains informing us that a session on one of our nodes timed out. This could be due to one of two reasons. 1) The target we're scanning has detected us and is blocking one of our scanning nodes, or 2) since we're using Amazons t2.micro instance, we're not always guaranteed to get the resource. (to get a guaranteed resource, you can choose a higher powered instance). However, the script creates a config for proxy chains which tells it to flag when a node has stopped responding, and to ignore it going forward. This means our scan isn't halted by this timeout, it just fails over to the next available node.
When finished, all you have to do is type enter in the first console. The script will terminate the instances, remove the temporarily created ssh keys and firewall rules used for the cluster.